Sw4 > Prompts > Prompts (All Contents)
Prompts
This section discuss the area of user prompts. Prompts are the dialog windows that we open asking them for input, a decision, or simply giving them information.
When I wrote my first Omnis application I used the built in prompts. OK message, Yes/No Message, No/Yes Message, and Prompt for input. These are modal prompts. With a modal window when the prompt window opens, code execution halts, and nothing happens until the user clicks one of the prompt window. Code execution continues immediately from where it left off.
The built in prompts have several limits:
- 255 character limit
- Only one font size
- Limited button choices (OK, Cancel, Yes, No)
- Only one input field at a time
Because of these limitation I eventually started to create my own prompt windows for special situations. The prompt windows I created were always modal because that was the easiest way to write the code. Writing custom prompt windows freed me from the limitations of the built in prompts, but it was extra work to write a custom prompt window for each situation and hard to keep them consistent. Being a lazy programmer I created an oPrompts object class with various standard methods for generating prompt windows.
As I got into Object-Oriented Programming I heard that modal prompts were not considered to be good coding practice, but never really understood why until I started extending my Omnis app to the Omnis web app server where everything is modeless. You can't prompt a web browser and halt your code on the server waiting for a response. The web is completely modeless. Code that depends on modal prompts is dead in water if you try to reuse it for the web. This was when I finally realized why modal prompts were not consider good Object-Oriented Programming.
Writing code for modeless prompts requires that you feed the prompt window with all the information needed to continue code execution after the user clicks the Okay button. When the user clicks Okay the modeless prompt window has to send a message somewhere. The method that opens the modeless prompt must give the prompt window a call back class and call back method. The prompt window can then send a message to the call back class passing along the user input values in row variable as well as the button pressed by the user.
It is extra work to write code for modeless prompts but the code you write can be reused if you extend your app to the web. Modeless prompts also free up your user. The user can open another window, lookup some information, enter a record, click the enter or return key multiple times, and then bring the prompt back to the front, complete the information and continue. You just can't do that with modal windows.Modal Prompts
The StudioWorks framework has an oPrompts object for generating modal prompt windows. The object is instantiated by the prmpts startup task variable. The following code can be used to open a prompt window:
; (pMssg,pTitleStbNameID_opt,pIconName_opt,pDtls_opt)
Do prmpts.$promptYesNo('This is a yes/no prompt window.','The Prompt Title','DialogCaution','This is additional details to pass on to the user.') Returns ButtonPressed
If low(ButtonPressed)='yes'
OK message (Icon) {The [ButtonPressed] button was pressed.}
Else
OK message (Icon) {The [ButtonPressed] button was pressed.}
End If
Using the you can look at the different $prompt... methods available to your StudioWorks application via the prmpts task variable.
- $promptSave - Puts up the standard dialog window with a DialogSave icon.
- $promptDelete - Puts up a dialog window with a DialogDelete icon.
- $promptDelete - Puts up a dialog window with a DialogDelete icon.
- $promptInputVars - Lets you pass in a bunch of different types of variables with labels. Appropriate input fields of the correct data type are automatically added to the dialog window. (Checkboxes for boolean, droplist for lists, etc.)
- $openSubWinPrompt - Instantiates a custom subwindow which you create. The wPromptShell takes care of the title, message, details, icon, buttons, Your custom subwindow is instantiated in the centre of the shell window. You are responsible for halting code execution with Enter data and then finding out the button pressed, getting a reference to your subwindow instance, getting the input values from your subwindow, and then closing the prompt. Sample code is as follows:
; Calculate the parameters to be passed to the prompt method.
Calculate Title as 'Custom Prompt Window'
Calculate Mssg as 'The message for the user'
Calculate Dtls as 'Additional details to pass on the user.////This is a custom subwindow prompt.////The custom subwindow is instanitated in the centre of the prompt shell.'
Calculate IconName as 'DialogInfo'
Calculate ButtonIDs as 'Cancel,Continue'
Calculate ButtonModes as 'kBMcancel,kBMuser'
Do $clib.$windows.$findname('wPromptDemoSubWin') Returns rSubWinClass
; Open the prompt window.
; (prSubWinClass,pfrSubWin,pMssg,pTitleStbNameID_opt,pIconName_opt,pDtls_opt,pCSVButtonStbIDsLeftToRight_opt,pCSVButtonModesLeftToRight_opt)
Do prmpts.$openSubWinPrompt(rSubWinClass,rSubWinInst,Mssg,Title,IconName,Dtls,ButtonIDs,ButtonModes) Returns rPromptWin
; Halt code execution. The user must press okay or cancel to contine.
Enter data
; Find out which button the user pressed.
Do rPromptWin.$:ButtonPressedName() Returns ButtonPressed
If low(ButtonPressed)='continue'
;
; Get the input variable values from the subwindow instance.
Calculate DateFrom as rSubWinInst.$:DateFrom
Calculate DateTo as rSubWinInst.$:DateTo
; Close the prompt window.
Do rPromptWin.$close()
OK message (Icon) {The dates entered were: ////Date From: [DateFrom] ////Date To: [DateTo] ////Button pressed was: [ButtonPressed]}
Else
OK message (Icon) {The [ButtonPressed] button was pressed.}
End If

Use of modal prompts is not recommended. Structuring your code for modeless prompts is more work but will pay off when you want to add web capability to your StudioWorks application.
Modeless Prompts
It took 5 years of writing code before I realized the value of modeless prompts and then figure out how to structure code to work with modeless prompts. Writing web apps is what ultimately convinced me and also opened my eyes to see how to structure the code.
With the Omnis web app server, an HTTP request is received by the web app server and includes in its parameters an Omnis library and an Omnis class (remote task). (OmnisLibrary, OmnisClass) The parameters also include all the input fields and values of the form on the web page. The Omnis web app server instantiates the specified remote task in the specified library and passes a parameters row variable to the $construct method. The remote task looks at the parameters, processes the request, and returns the HTML which refreshes the page. The HTML returned includes all OmnisLibrary and OmnisClass which are to be included in the parameters of the next HTTP request.
Each web page must contain all the information necessary for calling and executing the next request.
The above pattern is what is used for the StudioWorks modeless prompts. If code execution needs to continue after the prompt window a call back library, class (object), and public method, must be sent to the prompt window along with any input variables the user needs to fill in. When the user clicks the Okay button the prompt window can then instantiate the specified object class and send a message (the public method name) to the object instance, passing along the button pressed and the input variables row.
The StudioWorks framework has an oPromptsModeless object for generating modeless prompt windows. The object is instantiated by the modelessprmpts startup task variable. The following code can be used to open an Okay modeless prompt window:
; Get a prompt parameters row.
; (pMssg,pDtls,pTitle,pIconName)
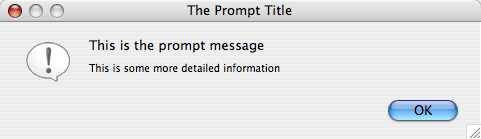
Calculate Mssg as "This is the prompt message"
Calculate Dtls as "This is some more detailed information"
Calculate Title as "The Prompt Title"
Do modelessprmpt.$retParamsRow_promptOK(Mssg,Dtls,Title) Returns ParamsRow
; Open the modeless OK prompt.
Do modelessprmpt.$prompt(ParamsRow)
; OK message (Icon) {Notice that the modeless prompt does not halt code execution.////This Okay message is in the method immediately after opening the prompt window.}
Modeless Input Prompt
You can generate modeless user input prompts which have any number of input fields. The input variables are added to a row variable which is passed to the $prompt method of the oPromptsModeless object. The input variables row is passed to the wPromptModelessSubWin window class which then process the row variable adding input fields on-the-fly and mapping the $dataname of the field to the column in the input variables row.
The subwindow defaults the inputs fields based on the data type of the input variable row column.
- kBoolean data type uses kCheckbox field
- kList data type uses kDroplist
- kPicture data type uses kPictureobj
- All other data types default to kEntry field
A column with the name matching the input variable row column name is added to the prompt parameters row. The matching column in the prompt parameters row is used to store properties which are to be used when adding the input field to the prompt window. The first property is the $text property used for the input field label. (e.g. $text=DateFrom ;) Each property is delimited with the ; semi colon character.
If you want to add an input variable with radio button choices you would add the following extra properties to the column in the parameters row.
$objtype=kRadio ; radiobuttonstext= Mn.Summary, Mn.Detailed ;
If you want to to use a check box list rather than a droplist you would add the following extra properties to the column in the parameters row.
$objtype=kCheckBoxList ;
If you wanted to control the width, height, or any other property of a field, you simply include it with the extra properties for the column.
$height=300 ; $width=500
If you wanted to pass a hidden variable through the prompt window.
$visible=kFalse
If you wanted a display only variable in the prompt window.
$active=kFalse
The modeless input prompt window needs to know who to call back if the user presses something other than the cancel button. There are 3 call back columns in the prompt parameters row: callbacklibname, callbackclassname, callbackmethodname. After you get the parameters row you can calculate each of the call back column values:
Calculate ParamsRow.callbacklibname as 'TheLibraryName'
Calculate ParamsRow.callbackclassname as 'TheClassName'
Calculate ParamsRow.callbackmethodname as 'TheMethodName'
... or you can use the $setCallBackCols method sending it a reference to the call back method.
Do modelessprmpt.$setCallBackCols(ParamsRow,rCallBackMethod) Returns FlagOK

The call back will be made to a new instance of the object. Do not attempt to call back to an existing instance of an object. Any variables you want preserved must be passed using the input variables row
The following sample code generates a modeless prompt which instantiates and calls back to an object class passing the button pressed and input variables row to the call back method. The example is longer that what you would normally need for an input prompt, but it shows you the different things you can do with the modeless prompts object.
; Get a prompt parameters row.
; (pMssg,pDtls,pTitle,pIconName)
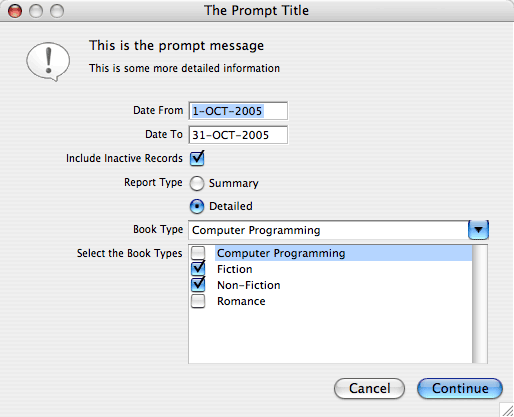
Calculate Mssg as "This is the prompt message"
Calculate Dtls as "This is some more detailed information"
Calculate Title as "The Prompt Title"
Calculate IconName as 'DialogInfo'
Do modelessprmpt.$retParamsRow_promptContinue(Mssg,Dtls,Title,IconName) Returns ParamsRow
; Set the call back columns
Do $clib.$objects.oPromptDemoCallBack Returns rClass
If isnull(rClass)
Do errhndlr.$logProgramError_ClassNotFound($cmethod,'oPromptDemoCallBack')
Else
Do modelessprmpt.$setCallBackCols(ParamsRow,rClass,'$printSpecialReport') Returns FlagOK
If FlagOK
; Add the input variables.
Calculate Label as "Mn.DateFrom" ;; Note: String table format 'Mn.DateFrom' can be used.
Do modelessprmpt.$addInputVar(ParamsRow,InputVarsRow,DateFrom,Label)
Calculate Label as "Date To" ;; Note: String table format 'Mn.DateFrom' can be used.
Do modelessprmpt.$addInputVar(ParamsRow,InputVarsRow,DateTo,Label)
; Use $visible=kFalse to pass hidden values through the prompt window to the call back method.
Calculate Label as "HiddenDate"
Calculate ExtraPropsString as "$visible=kFalse"
Do modelessprmpt.$addInputVar(ParamsRow,InputVarsRow,HiddenDate,Label,ExtraPropsString)
Calculate Label as "Include Inactive Records"
Do modelessprmpt.$addInputVar(ParamsRow,InputVarsRow,bInclInactive,Label)
Calculate Label as "Report Type" ;; Note: String table format 'Mn.ReportType' can be used.
Calculate RadioButtonsText as "Mn.Summary, Detailed" ;; ... or Mn.Summary, Mn.Detailed'
Do modelessprmpt.$addInputVar_kRadio(ParamsRow,InputVarsRow,pick_Summary_Detailed,Label,RadioButtonsText)
Do BookTypesDropList.$cols.$add('BookType',kCharacter,kSimplechar,100)
Do BookTypesDropList.$add('Computer Programming')
Do BookTypesDropList.$add('Fiction')
Do BookTypesDropList.$add('Non-Fiction')
Do BookTypesDropList.$add('Romance')
Do BookTypesDropList.$line.$assign(1)
Calculate Label as "Book Type"
Do modelessprmpt.$addInputVar(ParamsRow,InputVarsRow,BookTypesDropList,Label)
Calculate BookTypesCheckList as BookTypesDropList
Do BookTypesCheckList.2.$selected.$assign(1)
Do BookTypesCheckList.3.$selected.$assign(1)
Calculate Label as "Select the Book Types"
Calculate ExtraPropsString as "$objtype=kCheckBoxList ; $width=300 ; $height=120 ;"
Do modelessprmpt.$addInputVar(ParamsRow,InputVarsRow,BookTypesCheckList,Label,ExtraPropsString)
; Add a combo entry field.
Calculate BookTypesComboList as BookTypesDropList
Calculate Label as "Book Type Combo Field"
Do modelessprmpt.$addInputVar_kCombo(ParamsRow,InputVarsRow,BookType,Label,BookTypesComboList)
; Open the prompt
Do modelessprmpt.$prompt(ParamsRow,InputVarsRow) Returns FlagOK
End If
End If
If not(FlagOK)
Do errhndlr.$promptonceLastError()
End If
Quit method FlagOK
The callback method needs to include the following parameters:
- pButtonPressed - The $name of the button which the user pressed is passed via this parameter.
- pfList - This list contains each of the input variables and the value entered by the user and any hidden values you passed to the modeless prompt.
Put a Breakpoint in the callback method and then look at the values in pfList. You can then extra the values from the list and write the rest of callback method code.
Press the button at the bottom the window to open a modeless prompt using the sample code.

If you pass a SQL defined list of records, the prompt subwindow will automatically get the SQL meta-data and only display the includeinprompts columns for the list field $calculation property. If you specify the $objtype=kHeadedListBox the list related SQL meta-data will be used for setting field properties.