Sw4 > Sql > SQL (All Contents)
SQL
This section covers various topics about SQL (Sequential Query Language) as they relate to StudioWorks.Parent/Child Tables
SQL is a relational database. This means that you can relate a record in one table to record(s) in another table.
Records are related through foreign keys. A foreign key is said to reference a column in another table. The referenced column is called the parent key and is normally the primary key of the referenced table.
Using the example of books and authors, a single author can write multiple books.
Author = parent table
Author_pkey = primary key
Book = child table
Book_fkey = foreign key
Referenced Column = Auhor_pkey
Parent key = Author_pkey
Base Schema
In StudioWorks when you create a query class that includes columns from more than one schema class you can specify one of the schema classes as the Base Schema, in the SQL class meta-data. The default is the schema class of the first column in the query class.
If the query class is used to insert, edit, or delete records - only the server table of the Base Schema will be affected when you issue a $doworkBatch.
Do QueryList.$doworkBatch() Return FlagOK

Only the columns of the Base Schema which are included in the query class will be updated by the $doworkBatch. Be sure to include the admin columns in any query class you use in an edit window.
Moving Data
You can use the DBAdmin tool for moving data from one database to another database provide that all of the schemas are in your StudioWorks app for the data you want to move. The meta-data must also be up to date for the schemas.
The steps are as follows:
- Create the new database which you want to move the data to. The database could be a new Omnis data file, a FrontBase database, MySQL database or some other RDBMS which the DBAdmin tool is able to work with.
- If the RDBMS supports users, add the superuser user _SYSTEM and the tablesowner user DBADMIN with the usual StudioWorks password.
- > in case there have been any changes to SQL classes or meta-data.
- > to open the DB Admin window.
- Click the link in the top right corner of the window.
- Create and save a session which is mapped to the your new database. and then the session to make sure StudioWorks is able to logon to the database with the information you entered.
- If the source database is not the one you are currently logged onto with your StudioWorks app you will need to create a second session mapped to the old database. and the second session to make sure StudioWorks is able to logon to the source database.
- Close the window.
- Click the tab in the DBAdmin window.
- Set the session droplist to the source database.
- Set the session droplist to the target database.
- Select the schema tables in the From list which you want to move to the target database.
- Click the button. The DBAdmin tool will loop through the selected schemas and create the tables in the target database.
- Click the button. The DBAdmin tool will loop through the selected schemas and move the data from the source database to the target database.
Converting Data
Numerous attempts have been made by myself and other StudioWorks developers to create a generic data converter. The reality that we have all discovered is that it is virtually impossible to write a generic data converter. There are an infinite number of possible structures for the source data and it seems none of it is ready to be ported straight into the new and improved SQL database which you have designed for your StudioWorks app.
There are however some techniques which you can use to simplify the process of converting your old data and moving it into your new StudioWorks friendly database. This sections covers various tips and tricks to help you with the conversion process.
For the majority of applications I have written, I have spent more time on the data conversion than writing the app.Data Converter Demo
StartNewApp
includes a myDataConverterDemo library which is located inside the APP/libraries/db2sess/ folder.
You can open the library in by selecting menu > menu >
All going well this will open the myDataConverterDemo library and then open the wDataConverter window located inside the library.
The myDataConverterDemo library contains several objects which you can use for writing your own data converter.
- oDataConverter - This object class contains demo code that you can study, copy and modify for your own data converter code. The $importOldData method is called by the button on the wDataConverter window.
- oSQLLists_db2sess - The $retDefinedList method of this object is called by the oDataConverter object to return SQL defined lists based on schema or query classes located inside the myDataConverterDemo library.
- tBase_db2sess - This table class is used by the $retDefinedList method of oSQLLists_db2sess. The table class has $getAllRecords, $getWhere, $selectWhere methods which can be used to select and fetch records from the old database.
- oDataConverterTools - This object class has some handy methods which are called by the oDataConverter object. You can call these methods from your own data converter code in the oDataConverter object.
Data Converter Instructions
If you have an Omnis classic application and data file that you wish to convert to Omnis Studio and StudioWorks the following steps can be followed for setting up your StudioWorks app for converting the old Omnis data file.
- Create a data_OldClassicApp folder inside your APP folder. If the folder already exists, delete any contents inside the folder.
- Drag your old app's data file into the folder.
- Create a db2sess folder inside your APP/libraries/ folder if it doesn't already exist.
- If it doesn't already exist, drag the myDataConverterDemo.lbs library from StartNewApp into the db2sess folder.
- Rename myDataConverterDemo.lbs to an appropriate name for your APP. e.g. ClassicDataConverter.lbs
- From your StudioWorks app's menu, open the window.
All going well your data converter library will be opened and the wDataConverter window inside the library will be opened. - Click the button in the window.
- > > session > click the node.
- There should be a list of all the tables in your old Omnis data file.
- Select all of the old tables and drag them into the Schema Classes folder of your Data Converter library.
- This creates one schema class for each table in the old data file.
- You are now read to start writing code in the oDataConverter object of your Data Converter library.
- You will want to get all the records from the old data file into a list, then fix and parse the data as needed to get it ready to insert/update tables in the new data base.
Often times the table structure in the new data base will be structured differently than the data in the old data file so you will need to do import the old data into a list, merge the columns you want into separate lists and insert records starting with the parent table, then insert and link child records to the appropriate parent records.
Getting you new database structure right and converting your old data can take as much or more time that writing the application. Time spent getting the new database designed right is time well spent.
If you are unfamiliar with SQL and database design you may want to consider hiring myself or another StudioWorks developer who has experience to assist you. A week or two of consulting and assistance could easily save you months of work trying to do the data conversion.Data Conversion Advice
I've done a few data conversions from various sources. The following are some general recommendations:
- If you are not familiar with SQL and designing RDBMS databases, take the time to read by Michael J. Hernandez.
- Design your new database. If your application's database is large and complicated, start with desiging a few simple lookup tables. e.g. Country, Stateprov, Towncity.
- Create the schema classes for a few of the simple tables.
- Add the SQL-Meta Data. For lookup tables set the class meta-data fetchall checkbox to checked.
- Create the tables in your new database.
- Write the data import routine for the first table, following the code in the oDataConverter object class.
- Step through the code importing the data from old data base and inserting it into the new database.
- Add the list view window for the table to your navigation list
- Layer by layer add the data for additonal tables
Sign In (Logon)
One of the most problem prone areas with creating and starting a new application is preparing the database and initially logging on to the database.
If you are using the Omnis data file, things are relatively simple because unlike read DB management systems, the Omnis data file doesn't support or enforce 'Users' and 'Permissions'.
Signing in (logging on) to a new database becomes a chicken-and-egg situation where we want StudioWorks to add a 'usr' table to the datatabase and insert a system administration user so that you can signin-in, but for StudioWorks to do this it needs to somehow logon to the database as the 'tables owner' database user.
Once you get the database setup with the tables owner user, the 'usr' table added, and a system administrator inserted into the 'usr' table you can easily 'Sign-In'... but getting there can be a headache.
This section explains how StudioWorks version 4 tries to making setting up a new database as simple as possible for the developer and very easy for the end users.Database Users
With SQL92 compliant databases:
- The database is owned by a superuser.
- Database tables are owned by a tables owner user.
- Database users must be granted select, insert, update, and delete privileges for each database table they wish to access.
The superuser, tablesowner, and database user could all be the same user, however, experienced SQL92 developers have suggested to me that this is not a good idea.
It is important that we understand and use consistent terms when discussing users.
- Superuser - The root user who owns the database. The root user can add/delete/modify other users. The root user can change other users passwords.
- Tables Owners User - The user who owns the tables in the database. Different tables in the database could be owned by different users but avoid doing so unless you have a logical reason for doing so.
- Database Users - These are individual users who are permitted to logon to the database and are granted privileges to select, insert, update, and delete records in various tables.
- Application Users - These are users which you insert into the 'usr' table in the database. The 'usr' table has additional fields of information needed by StudioWorks version 4 to enforce security access to menus, windows, and reports for users and groups.
To simplify starting a new database StudioWorks version 4 has a number of defaults which you should use when setting up a new database. You can change the default passwords for higher security prior to releasing your application to the customer.

Note: To find the StudioWorks version 4 default users and passwords search the StudioWorks Wiki for 'Default Database Users'
The StudioWorks version 4 framework is designed to support having a database user for every application user.
The advantages of having a database user which matches each of application user are:
- Using the DB tool provided by the DBMS vendor the database adminstrator can tell each individual user who is logged onto the database. If one user was running a query that was tying up the database, the administrator could kill that user's session.
- The database will enforce table security on a user by user basis. If users are accessing the database through various applications (e.g. web browsers, Crystal reports, etc.) the database will only allow them to access or update tables which they have been specifically been granted those privileges.
The disadvantages of having a database user which matches each of application user are:
- Every time you add a table to the database you must grant privileges to your users to access the table or they will get a SQL error when they try to access the table.
- Every time you add a user you must grant privileges to that user for the tables the user needs to access.
- You must keep the database users and passwords in sync with the application users and passwords.
Tables Owner Logon
If you choose the StudioWorks version 4 default of not adding a database user for every application user, the window has to be able to open a session with the database logging on as the tables owner. The DBMS won't know about the application users so they can't directly logon to the database.
To accomplish this without giving the users the actual tables owner name and password, StudioWorks version 4 allows the database administrator to create an encrypted tablesownerlogon.txt file which is stored in the startupsettings folder. On sign-in StudioWorks version 4 decrypts the file and logs on to the database as the tables owner. StudioWorks version 4 then fetches the application users from the Usr table and checks the user and password entered by the user against the list of application users. If a matching application user is found and the password matches the sign in process is completed and the main menu is installed and the main window is opened.
The tablesowner.txt file that ships with StudioWorks version 4 uses the default tables owner name and password. (To find the defaults ask the StudioWorks members list). If you use the defaults, you won't need to create a new encrypted file.
To create a new encrypted file:
- Make sure the correct session is selected in the sessions picker droplist.
- Select the tab.
- Click the button at the bottom of the window.
This creates the encrypted file with the file path APP/startupsettings.tablesownerlogon.txt. The encrypted file contains the tables owner name and password. Encrption is done using the blowfish object.
Alternately you can store the tables owner logon information in a saved session as follows:
- Open the Sessions Manager window.
- Create a new session and enter all of the session information including the user name and password for the superuser and the tables owner. Be sure to use a unique name for the session name.
- Save the session and then click the button in the toolbar to make sure it works.
- In the startupsettings.txt file, in the logon group, include the following:
sessionname = TheUniqueSavedSessionName ;
Prepare New Database
StudioWorks version 4 tries to make preparing a new database a simple task... but be prepared for a few speed bumps to get in the way.
To prepare a new database.
Using the database vendor's tool:
- Create a new database.
- Set the database superuser name and password to the StudioWorks version 4 defaults.
Note: The defaults names and passwords can be found by searching the StudioWorks Wiki. - Add a tables owner user and password matching the StudioWorks version 4 defaults.
Make sure the tables owner default schema is set to the tables owner name.
Using your StudioWorks application:
- Open (or reopen) your StudioWorks application to get to the Sign In (Logon) window.
- Enter the tables owner name and password.
- StudioWorks will logon as the tables owner, check to see if any tables exists, and if none, will prompt you with a message asking if this is a new database and if you want StudioWorks to prepare the database. Click Okay.
- StudioWorks will create tables and views in the database for all the schemas and views included in your application's modules.
- StudioWorks will copy records from the APP/startupsettings/NewData.df1 file into the matching tables in your new database.
- All going well StudioWorks will prompt you with a message to logon as the system administrator.
- Enter the system administrator name and password and click the button.
- Test adding/editing/deleting records in the new database.
- Add application users, groups, security privileges and test signing in as different application users.
Logon Settings
You can preset any of the session properties for the default session which StudioWorks loads when your application is opened.
The startupsettings.txt file located in the APP/startupitems/ folder is where you can control the startup session properties.
StudioWorks checks for a startupsettings.txt file, and if found prepares a session row variable using the properties which if finds in the logonsettings{} properties group in the file.
The actual opening of a session with the database does not occur until after the user clicks the button on the Sign-In window. This gives the user (or developer) an opportunity to change the session settings which are preset by the startupsettings.cfg file. The user can change the session or session settings by clicking the button on the Sign-In window.
If the startupsettings file is not found or doesn't contain a logonsettings properties group StudioWorks simply uses the last selected session.
If there are no saved sessions the user will need to click the button to open the window where they can create a session. See Sessions Manager for details on creating and modifying sessions.
The following is sample logon settings text from a startupsettings.txt file
/*
----- Logon Settings -----
On starting up the application will check this file for any logon settings.
Any session properties specified in this configuration file will be used
for the initial logon session settings. If no settings are specified in this
file, the last session will be used.
-----
*/
logonsettings {
damname = FRONTBASEDAM ;
hostname = localhost ;
tablesownerlogon = TRUE ;
}
Database Sessions
In order to communicate with a database from Omnis Studio you need to open a session with the database. Omnis Studio provides a number of DAMs (Database Assess Modules) as external components. You instantiate the external component using an object or object reference datatype variable. After you instantiate the external component you open a session with the database by sending a $logon message with the appropriate parameters. Some of the DAMs require that you first set the $database or $databasename property before you send the $logon message.
This section covers the oDBSession series of object classes which make it easy for StudioWorks developers to implement and access Omnis Studio sessions.
The oDBSession series of object classes were introduced to StudioWorks in 2008-04. Prior to 2008-04, the oLogon series of objects were used for database sessions. These oLogon objects were designed prior to the object reference type variables, they depended on session names, and they did not support session pools. The new oDBSession series of object were built to overcome the weaknesses of the oLogon series objects and introduce other new features. An oLogon_adapter_to_dbsess object was created to provide compatibility to code written for the oLogon object. See the topic for more details.
oDBSession Object as Adapter
The oDBSession object is an adapter to the external DAM objects that Omnis Studio provides for communicating with various RDBMSs.
The majority of the messages (method calls) you would normally send directly to a DAM's session object, you now send to the oDBSession object.
- $logon, $logoff, $state
- $commit, $rollback, $transactionmode, $transactionmode.$assign
- $tables, $columns
- $damname, $hostname
Some of the session object methods had to be changed because Omnis Studio would not work with those method names when attempting to send them to the oDBSession.
- $sessionobject became $getSessionObject(pfRetSessionObject)
Testing a returned session object to make sure it is valid can be difficult to test. Using a $get... method that passes the session object to the sender via field reference variable and returns flag true or false is much easier to work with your code. The same goes for statement objects. For that reason the oDBSession object uses a $getStatementObject(pfRetStatementObject) method instead of $newstatement.
Try to void using $getSessionObject in your code. Doing so means that you are be dealing directly with the session object in your code. The oDBSession object is an adapter and is therefore meant to be between your code and the actual Omnis Studio session object. If you need to $assign the $transactionmode, $commit or $rollback, or get a new statemement object($getStatementObject), then call the oDBSession methods by those names, rather than working directly with the Omnis Studio session object.
The benefit of communicating with the DAM session external object via the oDBsession object is that oDBsession can deal with the differences between the various DAMs, and it can catch and log errors for you.
One example is that if the network connection is lost, the DAM session object's $state will still report kSessionStateLoggedOn. Knowing this weakness in the DAM session object, the oDBSession object's $state method first test the connection with the database server, and if successful, it returns the $state property of the DAM session object. The $getStatementObject also tests the connection and if it fails will first attempt to reconnect the session, and if successful passes back a statement object and returns true, if it can't connect it will log an error and return false.
TCPPing-ing the server can be avoided by setting pingtimeoutseconds to zero in the session row used to initialize oDBSession.
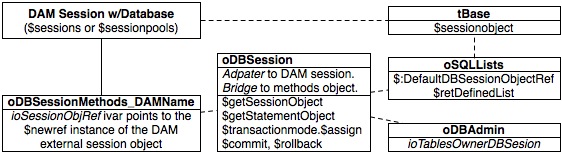
The following diagram gives you and idea the the class structure for the oDBSession series of objects.

The following sample code shows how you might use the oDBsession object instantiated by the task variable db1sess. The objective of the sample code is to demonstrate how you are to communicate with the oDBSession object instance just the same as you would communicate with an actual Omnis Studio session object.
Do db1sess.$transactionmode.$assign(kSessionTranManual)
Do db1sess.$getStatementObject(StmntObj) Returns FlagOK
If FlagOK
Calculate SQLText as "DELETE FROM Purchaseorder WHERE PO_Status = 'Cancelled'"
Do StmntObj.$execdirect(SQLText) Returns FlagOK
If FlagOK
Do db1sess.$commit()
Else
Do db1sess.$rollback()
End If
End If
Do db1sess.$transactionmode.$assign(kSessionTranAutomatic)
Quit method FlagOK
oDBSession Object as Bridge
The oDBSession object is a bridge to the various oDBSessionMethods_DAMNAME object classes. (oDBSessionMethods_MYSQLDAM, oDBSessionMethods_PGSQLDAM, oDBSessioMethods_OMSQLDAM, etc.)
The $initialize method of oDBSession instantiates the appropriate oDBSessionMethods_DAMNAME object class for the DAM specified in the SessionRow that is used to initialize the oDBSession object.
This makes it easy to introduce new DAMs and to override and modify code for specific DAMs. StudioWorks developers can even override the StudioWorks oDBSessionMethod_DAMNAME objects by subclassing any or all of them to their main library and then overriding method(s) in their main library subclass object.
oDBSession forwards the $initialize message to the oDBSessionMethods_DAMNAME object. The oDBSessionMethods_DAMNAME object has an ioSessionObjRef ivar that is an datatype. The ioSessionObjRef ivar is bound to the appropriate DAM external component using $newref. This creates a stable instance of the external component object in memory which ioSessionObjRef points to.
All of this is really behind the scenes and transparent to your application code. As long as your code sends its requests for new statement objects and session objects to oDBSession you won't need to know or worry about what goes on behind the scenes.
oDBSession can be instantiated by a task, instance, or local variable. In StudioWorks the main session is instantiated by the db1sess object reference task variable of the main library's Startup_Task. An object reference variable can be passed and copied all over the place. Every object reference points to the exact instance of the object in memory. That makes it very easy to pass around the db1sess object reference of main session's oDBSession object instance.
In StudioWorks the db1sess object reference is copied to object reference ivars in oSQLLists, oRefs, and oErrorHandler. As long as all of those objects ask their ivar object reference (which points to the db1sess tvar's oDBSession instance in memory) for new statement objects or session objects each time they need one, behind the scenes we could reconnect to the database with a different session name, change from sessions to session pools, and even connect to a different database. All of this could be done without needing to notify the other objects, and our code would hold together.
The following diagram shows how various classes can point to the same session object via the ioSessionObj ivar of oDBSessionMethods_DAMNAME by getting a session object reference via the oDBSession's $getSessionObject method.
Messages sent to oDBSession are forwarded to the instantiated oDBSessionMethods_DAMNAME object.
You should instantiate and initialize one oDBSession object for each session you wish to open with a database.
If your application needs to communicate with more databases you can add an appropriately named task variable for each additional database or database session. You point each task variable to the oDBSession object.
- db1sess - the main session to the main database.
- db2sess - a session to a second database
- db3sess - a session to a third database
- db3sess2 - a second session to the third database
You do not have to use task variables to instantiate the oDBSession object. In some cases it will make more sense to use an instance variable or even a local variable.
You do not have to use object reference datatype variables to instantiate oDBSession, in fact in most cases you would use an object datatype.oSQLLists and Database Sessions
In Omnis Studio a list variable that is defined from a SQL class, either a schema class or a query class, can be used to select, fetch, insert, update, and delete records in a database.
The list must be defined using the $definefromsqlclass method and the list's $sessionobject property must be set to use a session that has been opened with the database which you want to select, fetch, insert, update, or delete records.
The following shows how you might accomplish this in Omnis Studio.
; Define the list.
Do List.$definefromsqlclass('myAppModule.sCountry')
; Set the session object.
Do List.$sessionobject.$assign($sessions.MYAPPMAIN_1.$sessionobject)
; Select and fetch records.
Do List.$select() Returns FlagOK
Do List.$fetch(kFetchAll) Returns FetchStatus
The oSQLLists object in StudioWorks is instantiated using the lsts startup task variable. oSQLLists is command central for all things SQL list related. The $retDefinedList method returns a list that has been defined using $definefromsqlclass and has the $sessionobject set to the session object which has been opened by dbsess.
The following shows how you would accomplish the same thing in StudioWorks as was done in the previous code sample.
; Get a defined list bound to table class tBase, with the session object assigned
Do lsts.$retDefinedList('sCountry') Returns List
; Get all the records.
Do List.$getAllRecords() Returns FlagOK
In StudioWorks after the user successfully signs in via the window, oSQLLists is sent a $:DefaultDBSessionObjRef(db1sess1) message thereby pointing it to the db1sess1 startup task variable instance of oDBSession.
Each time oSQLLists is asked to $retDefinedList is sends a $getSessionObjectRef message to db1sess and assigns the session object passed back to the SQL defined list before returning it to the sender. (The $getSessionObjRef method checks to make sure the connection to the database is still valid and will attempt to reconnect if the connection has been lost.)
Some developers may need to work with more than one database, having some of the SQL defined lists pointing to one database and the rest pointing to a different database. To accomplish this you will need to set need to do the following:
- Add a db2sess task variable to the main library startup task.
- Set the datatype to .
- Point the task variable to oDBSession in your main library.
- Add a method called openSession_db2sess to your main library startup task.
- Add something like the following code to the method:
; Prepare a session row.
Do oSessionsManager.$:DefaultSessionRow_PGSQLDAM() Returns Row
If Row.$colcount
Calculate Row.sessionname as 'DB2SESS'
Calculate Row.hostname as '192.168.1.23'
Calculate Row.databasename as 'CorporateData'
Calculate Row.tablesownername as 'dbadmin'
Calculate Row.tablesownerpassword as 'secret'
Calculate Row.tablesownerlogon as kTrue
; Initialize the object.
Do db2sess.$initialize(Row) Returns FlagOK
If FlagOK
; Logon
Do db2sess.$logon() Returns FlagOK
If FlagOK
; Prepare a list of all of the SQL classes in the vsCorporate module.
Do lsts.$:DatabaseQueriesSchemasViewsList() Returns List
If List.$colcount=0
Calculate FlagOK as kFalse
Else
Do List.$search($ref.sqlclasslibname='vsCorporate')
Do List.$remove(kListKeepSelected)
; Set the dbsessionobjectref property for each of the SQL classes in the vsCorporate module to use the db2sess.
For List.$line from 1 to List.$linecount step 1
Do lsts.$setTableDBSessionObjectRef(db2sess) Returns FlagOK
If not(FlagOK)
Break to end of loop
End If
End For
End If
End If
End If
End If
Quit method FlagOK - Call the openSession_db2sess method from the end of the $signInOKContinue main library startup task method or at whatever point is appropriate for your application.
db2sess
The main library Startup_Task includes a db2sess object reference task variable which can be used for opening a session with a second database.
A couple situations where you might use the db2sess variable are:
- Fetching records from an old database which you are converting.
- Fetching records from a database which you have read-only access to. (e.g. The university's students database.)
In both of these situations you normally do NOT want all of the SQL classes (schema and query classes) which are related to the old database or the read-only database to be in your SQL Meta-Data and other StudioWorks related cached lists. If there are lots of SQL classes related to the db2sess, they will bog down and clutter up your StudioWorks related cached lists.
A trick you can use to keep these db2sess SQL classes out of your StudioWorks cached lists is to put all of those SQL classes in a separate library and put that library inside of a db2sess folder which you create inside your APP/libraries/ folder.
By default the main library will only open the libraries inside the APP/libraries/modules/ folder, ignoring the APP/libraries/db2sess/ folder.
StudioWorks only includes libraries which are inside the modules folders as being part of the StudioWorks application, therefore the SQL classes inside the db2sess folder will be ignored.
You need to then separately open the library located inside the db2sess folder, and you use a special oSQLList_db2sess object to $retDefinedList, and a special tBase_db2sess to $getAllRecords, $getWhere, $selectWhere, $fetchBatch.
The oSQLLists_db2sess object class and tBase_db2sess table class are located in the myOldDataConverterDemo library include with StartNewApp.Sessions Manager
The StudioWorks window is similar to the Omnis SQL Browser Session Manager.
The problem I have had with the Omnis Session Manager is that you have to know what the database needs in order to know which fields to fill in and which fields to leave empty. For example if you are creating a session for the Omnis datafile you need to enter the Omnis data file path in the Host Name field and leave the Database, User Name, Password, and Initialization field empty. However, if you are creating a session for FrontBase you need to enter the hostname/databasename in the Host Name field, leave the Database field empty, and fill in the User Name and Password fields.
The StudioWorks Session Manager tries to help the developer and end user with creating and modifying sessions by:
- Hiding the non-applicable entry fields based on the select DAM.
- Consistently having you enter the host name in the field and the database name in the field. StudioWorks take care of correctly formating the hostname/databasename when it logs on to the database.
- Providing a set of session templates for the various DAMs. The template entry fields contain hints where applicable. By clicking the button you can copy any of the templates and then modify the copy.
- Providing a toolbar button to let you immediately test your session settings.
The StudioWorks Session Manager prepares a session row which is defined using the schema class sSessions_listdef. The list definition includes additional columns which are useful to the StudioWorks framework.
- logonhostname - The hostname/databasename formatted correctly for logging on to the database.
- superusername, superuserpassword, tablesownername, tablesownerpassword - These column values are needed by the StudioWorks database administration objects.
- tablesownerlogon - Indicates whether StudioWorks is to logon as the tables owner or as a database user. StudioWorks defaults to TRUE.
Meta-Data
Meta-data is information about the database tables and columns. The is used to edit and view the meta-data.
Meta-data is stored with each SQL class (schema or query class) and with each schema or query class column. The meta-data is stored in a row variable which is copied to the $userinfo property of the respect schema or query class, or the schema class column.
Much of what you need to know about meta-data is in tooltips of the various fields in the .
Meta-data makes it possible to generate autoconfig list and edit windows. Meta-data makes it possible to synchronize the database to match the schema classes of your application.Admin Column Types
There are several types of admin columns which you can specify in the meta-data.
- editnum - This column is used for optimistic record locking. The EditNum is incremented +1 each time the records is updated in the database. If the old record EditNum does not match the current EditNum of the record in the database, it means another user has updated the record. The update is aborted.
- insby - This column is used store the primary key of the user which inserted the record.
- insdatetime - This column is used store the date and time which the record was inserted.
- modby - This column is used store the primary key of the user which last updated the record.
- moddatetime - This column is used store the date and time which the record was last updated.
- endby - This column is used store the primary key of the user which ended the record.
- enddatetime - This column is used store the date and time which the record was ended.
- active - This column is a 0 or 1 flag to indicate whether or not the record is active.
All of the above admin columns are optional. You can use as many or as few of the above columns as suits your requirements. It is strongly recommended that you include an editnum column in all of your schema classes.
I tend to use the editnum, insby, insdatetime, modby, moddatetime columns in most of my servertables.
I use the active column for most my tables. If a record is no longer actively used (discontinued inventory items, terminated employees) the user can set active to false. Inactive records don't show up in lookup droplists until the user clicks the button. If an active column is in the schema class, the fethallwhere in the schema class meta-data defaults to WHERE tablename.Active = 1, thereby reducing the intial list of records in the list to active records only.

Shift+click on the button in any list window to fetch all of the records. If there is an column in the headed list you can select any of the records on the list and then right-click on the selected records in the list. A menu item will appear in the context menu. Selecting this item will toggle the value of the active admin column for all of the selected lines. This saves the user from having to jump back and forth editing each individual record just make old records inactive.
Custom Meta-Data
Developers can add their own custom meta-data within the StudioWorks framework. The meta-data for each class and each column has a special row variable column named custominforow. You can defined this row variable with up to 400 columns of additional meta-data and within those 400 columns you can row and list columns so the number of additional meta-data columns is very large.
You will notice in the , within each meta-data tab, a tab strip in the window with a tab named . It is here that you can add your own custom meta-data fields.
When you look at under the tab you will see a subwindow with some instructions and a button. If you click the button StudioWorks will copy the subwindow window class from swBase4 to you main library. It will also copy the _listdef schema class used to define the custominforow to your main library.
There are 2 separate window classes and 2 separate schema classes that you can copy to your main library.
- wSQLMetaDataClassEditorCustomInfoRow is the window class for editing your class meta-data. You have one custominforow for each SQL class.
- wSQLMetaDataColsEditorCustomInfoRow is the window class for editing your columns meta-data. You have one custominforow for each column of each SQL class.
- sSQLMetaDataClassCustomInfoRow_listdef is the schema class for defining the custominforow of your class meta-data.
- sSQLMetaDataColsCustomInfoRow_listdef is the schema class for defining the custominforow of your columns meta-data.
Once the classes are in your main library you can modify them to suit whatever your heart desires.
You add a column to the applicable _listdef schema class, then add a matching label and field to the applicable window class.
After you close and reopen the your revised window class should appear under applicable the tab and you should be able to enter meta-data. Be sure to test that your meta-data is actually saved.
You can add columns and fields any time you like. Your custominforow is automatically redefined when you edit the meta-data and existing data is copied to the new row.
You can access your meta-data through the oSQLLists object what is instantiated by the lsts tvar.
If you want to get the custominforow for a SQL class you would do the following:
; Get the meta-data custominforow for the specified SQL class.
Do lsts.$retSQLClassCustomInfoRow(SQLClassName) Returns CustomInfoRow
If CustomInfoRow.$colcount=0
; An error occurred.
Calculate FlagOK as kFalse
Else
Calculate MetaDataValue as CustomInfoRow.colname
; Continue with your code.
End If
If you want to get the custominforow for a column you would do the following:
; Get the meta-data custominforow for the specified SQL class column.
Do lsts.$retSQLColCustomInfoRow(SQLClassName,ColName) Returns CustomInfoRow
If CustomInfoRow.$colcount=0
; An error occurred.
Calculate FlagOK as kFalse
Else
Calculate MetaDataValue as CustomInfoRow.colname
; Continue with your code.
End If
Database Administration
The StudioWorks simplifies the process of preparing and maintaining SQL databases.
In an ideal world all SQL database management systems would use the same SQL syntax, but we live in an imperfect world. The StudioWorks DB Admin classes overcome the SQL database differences by allowing us to customize the SQL text and methods for accomplishing various tasks for each RDBMS.
The StudioWorks DBAdmin classes performs tasks such:
- Creating and dropping tables.
- Adding, renaming, and dropping columns.
- Adding and dropping primary and foreign keys.
- Adding and dropping indexes.
- Adding and dropping constraints.
- Adding and dropping collations.
- Adding and droppping database users and changing passwords.
- Setting next primary key counters.
The DBAdmin tools are able to accomplish the above using the meta-data which you add to the schema classes using the SQL Meta-Data Editor.
The DB Admin tools are accessed via the tab of the .
All of the DB Admin functions can be accessed by your application through the oDBAdmin object. You simply create an object variable, point it to oDBAdmin, sent it an $initalize(pSessionRow) message, and you are in business. All of the public methods of oDBAdmin are at your disposal. You can create/sync tables, drop tables, drop columns, rename table, rename columns, etc., etc.
The various DB Admin windows are described in the next sections.Data Mover
If you create a new database and want to move data from an existing StudioWorks application based database to the new database the is your one click ticket.
To copy data from one database to another.
- Select the source database in the window.
- Select the target database. If you need to set up a session with the target database, select in the session picker, and then create and test the session in the window. The target sessions picker will be updates when you close the window.
- Click the checkbox if you want to see the number or records in each table in the source database.
- Select the tables in the source database list which you want to copy to the target database. You would normally select all of the tables in the source list.
StudioWorks use the foreign key score order of the source tables so that parent tables are created before child tables and parent records are copied before child records. - If your target database is a brand spanking database with no tables in it you have 3 choices:
- - click this button if the source database is fairly small.
- - click this button if the source database is big. The quick copy does not add indexes or constraints to the target database, so the copy operation is much faster. After the data is copied click the Full Sync button. This adds the indexes and constraints to the target database.
- followed by - This breaks the sync and copy operations into 2 separate steps.
- If you have already sync'd your target database in the window you can simply click the button to copy all of the data from the source database to the target database.
The sync operation always sets/resets the primary key counters. This ensures that the counter for each table will be greater than the maximum primary key value in each table after you copy in the new data.
The copy operation simply inserts the data. It does not check for existing records. The tables should alway be empty.
If the sync succeeds but then the copy fails part way through you can select and right-click on the tables in the target list and .
You can also right-click and select to completely delete the selected tables in the target database.Schema and Tables
The tab lets you look at all the schemas and columns in your application and the tables and columns in the database.
When you select a in the left list, the are listed in the second list. If a matching table already exists in the database it is selected in the the Table Name list, and the database table's columns are list in the Column Name list.
If you click the Sync Database to Match Selected Schemas, StudioWorks will do just that. If a table is missing it is created, if a column is missing it is added, if the column datatype has changed it is altered, if there is an extra column you are given a warning, if an index is missing it is added, if a foreign key constraint is missing it is added, etc. Each time the DB Admin tool sync's a table it also sets the primary key counter.
The button will loop through the selected schemas which have checked in the meta-data for the primary key column, and will check for a zero value primary key record and if not found insert one. Zero pkey records are used optional foreign key joins.Indexes
The DB Admin - tab simply lists the database tables and the indexes for the table you select.
You can right-click selected indexes.
A sync operation will readd meta-data based indexes you delete.Primary Keys
The DB Admin - tab lists the database tables, the maximum primary key value for each table, and the current primary key counter value.
You can right-click to set a counter to a specific value.
Clicking the Reset Counter Values button at the bottom of the window will reset the counters to one above the max value or each selected table.
A sync operation resets a tables primary key counter.Constraints
The DB Admin - tab simply lists the database tables and the constraints for the table you select.
You can right-click selected constraints.
A sync operation will readd meta-data based constraints you delete.
The Omnis data file does not support constraints. (other than not null)
All RDMBSs that I know of support foreign key constraints.
Some RDBMSs support CHECK constraints. (FrontBase and PostgreSQL)
Users
The DB Admin - tab lists the App users (in the usr table) the Database Users, and the database tables.
Code was written and tested for FrontBase for adding Database users which match the App users, and granting them privileges for selected tables.
The original intent was that a Database user would be added for each App user and the Database user's PRIVILEGES for each table would match their schema classes settings in their security profile. (canview, caninsert, canedit, candelete).
Keeping Database users sync'd with App users is a lot of work. Every time you add an App user or change an App user's security settings you have to sync the Database users.
Currently all of the StudioWorks developers use the tablesownerlogon technique, so I have not spent further time developing the code for synchronizing Database users with App users. The tab is currently disabled in the DB Admin window.Interactive SQL
You can use the window of the tool for entering and executing SQL.
I use the window for testing and editing long SQL queries that for some reason aren't working.
There are some handy features in the StudioWorks window that you should be aware of:
- - This is a list of the last 50 queries you executed in this window. Each time you successfully execute a SQL statement is it added to the end of the list. Any duplicate queries are removed from the list.
If you single click on a query in the history list it is copied to the SQL text field.
If you double click on a query in the history list it is copied to the SQL text field and it is immediately executed. - SQL Text - You enter and edit SQL text in this multi-line entry field.
For long SQL statements I like to use multiple lines, for example:SELECT TownCityName, StateProvName, CountryName
FROM Towncity, Stateprov, Country
WHERE Towncity.Stateprov_fkey = StateProv_pkey
AND Towncity.Country_fkey = Country_pkey
To execute the SQL text you have a number of options: - Click the button.
- Press the Enter key once on your numeric keypad.
- Press the Return key twice on your keyboard.
When you close the window the SQL history is saved to the local_prefs.df1 file.
When you open the window it is restored.Data Viewer
The DB Admin - tab lists the database tables and fetches the first batch of records the table you select.
You can right-click a record in a table.SQL Reserved Words
The DB Admin - tab lists the reserved words which StudioWorks uses to audit your table and column names.
Each time a sync operation is done, StudioWorks first audits the table and column names of all the selected tables. If a reserved word is used in a table or column name, an error is logged and the sync operation is halted.
This saves you the grief of wondering why a perfectly good looking SQL statement fails because it use a SQL reserved word for a table or column name. (I know from experience, I and others have lost hours trying to solve these types of SQL errors.)Query Builder
The Query Builder is a handy window that helps you build and modify query classes.
Base on meta-data Query Builder makes its best guess on the extra query text to join tables by way of their foreign key relationships.
Some of the advantages the Query Builder window are:
- Ability to drag and reorder multiple columns.
- Ability to select and right-click Delete multiple columns.
- Automatic generation of $extraquerytext based on foreign key relationships.
- Ability to have carriage returns in the extra query text making complex joins easier to read.
Table Classes
Table classes are the objects which communicate between your appliaction code and the database. By doing all of your communication with the database through the table class methods you give your application a layer of separation that makes it easy for your application to connect to SQL databases from different vendors.
All the communication with the database is through the table class, so if something has to be modified to suit a particular DBMS there is one central place, the table class, where the code can to be modified.
The base table class in StudioWorks is tBase. The base table class is able to use the SQL meta-data to make intelligent decisions when inserting, updating, deleting, and selecting database records. This saves you from writing a lot of custom table class code.
You should review all of the tBase table class methods using the .
This section covers some of the table class methods which you are likely to call from your application code.List & Row Variables
The first step in communication with the database is to bind a list or row variable to a table class and setting its $sessionobject property.
If you were doing this without StudioWorks the code might look something like this:
; Define the list using the table class tAuthor which points to the schema class sAuthor.
; This 'binds' an instance of the table class to the list.
Do List.$definefromsqlclass('tAuthor')
; Get a session object from a session which has been opened with the database.
Calculate SessionObj as $sessions.SessionName.$sessionobject
; Set the session object for the table class instance which was bound to the list.
Do List.$sessionobject.$assign(SessionObj)
Using StudioWorks you would do all of the above (and some) like this:
; Define and bind a list to the default table class and set it to the default session.
Do lsts.$retDefinedList('tAuthor')
The table class which you bind to can be pointed to a schema class or a query class.
Once you have a list or row variable bound to a table class which has its session object property set you are ready to select and fetch records from the database. If your list or row variable is mapped to a schema class you can also insert, update, and delete records.
If you are stepping through code in the debugger your can right-click on any list or row variable that is bound to a table class and select to view all the available table class methods. You can drag any of the methods from the into a Do statement.
Schema & Query Classes
Schema classes are mapped to database tables or views. Generally in StudioWorks you create a schema class and then using the Database Admin tool you synch the database to the match the schema class. This creates the table and columns in the database.
Query classes are normally used to join multiple tables into a single list or row variable. In the SQL world you could define a view which joins multiple tables. You could then map a schema class to the view. This technique works well if you need to do several joins to the same table in a select.
Query classes can also be used to select a reduce number of columns from a single table.
One of the rules in the SQL world is that you cannot insert, update, or delete records using a view which includes more than one table. The reasons behind this are very logical... it just doesn't work.
If you have a List or Row variable bound to a query class with multiple tables and you attempt to $insert, $update, or $delete, Omnis Studio will ignore your request.
The StudioWorks tBase table class has custom methods which allow you to insert, update, and delete records with a List or Row variable bound to a query class that joins multiple tables. The technique used to accomplish this is that the meta-data specifies the base table for the query class and StudioWorks prepares a SQL statement which only includes base table columns found in the query class, and then issues the insert, update, or delete statement to the database.
You should always use the custom tBase methods for inserting, updating, or deleting database records:
- $deleteRow, $insertRow, $updateRow
- $doworkBatch, $dodeletesBath, $doinsertsBatch, $doupdatesBatch
Fetching Records
Omnis Studio provides the table class methods $select and $fetch for getting records from the database. To get all of the records in a database table you could use the following code after binding a list variable to a table class and setting the session object.
Do List.$select() Returns FlagOK
; The flag will be false if a SQL error occurred.
If FlagOK
Do List.$fetch(kFetchAll) Returns kFetchStatus
If kFetchError
; Oops a fetch error occurred. Get the SQL error from the statement object.
Do List.$statementobject().$nativeerrortext Returns ErrText
End If
Else
; Oops a select error occurred.
Do List.$statementobject().$nativeerrortext Returns ErrText
End If
To accomplish the same thing in StudioWorks with a list variable defined using lsts.$retDefinedList you would do the following:
; Select and fetch all the records.
Do List.$getAllRecords() Returns FlagOK
If FlagOK
; No SQL error. The list could be empty if the table was empty.
Else
; The flag will be false if a SQL error occurred.
; The SQL error will have been logged with the SW error handler.
; If this is a visual class, prompt the user with the error message.
Do errhndlr.$promptonceLastError()
End If
In StudioWorks you can still use the Omnis Studio built $select and $fetch methods. StudioWorks has customer $selectWhere and $fetchBatch methods which give some extra functionality.
The tBase table class has the following $get... methods for selecting and fetching records.
- $getAllRecords() - select and fetch all the records.
- $getActiveRecords - select and fetch all the records where the active admin column = 1
- $getOperatorRecords(pColName,pOperator,pValue) - select and fetch records where the pColName =,>,<... pValue
- $getPrimaryKeyRecord(pPKeyValue) - select and fetch the record matching the specified primary key value.
- $getWhere(pWhereTextOrRow) - select and fetch records which meet the specfied where text or where row criteria.
Bind Variables
In SQL there are several pitfalls that can mess up the WHERE clause.
- Single or double quotes in the text string. Selecting the name O'Brian or a piece of lumber 2" x 4" x 12' doesn't work.
- Providing a date as a string in your SQL text. WHERE Date = '02-May-2004' will result in a "Datatypes don't match" SQL error.
- Providing a number value for a character field and not enclosing the number in quotes. If InvoiceNum is a character field, WHERE InvoiceNum = 015904 will result in a "Datatypes don't match".
Using bind variables is the answer to the above problems. The StudioWorks methods $getWhere and $selectWhere accept a text variable or a row variable for the WHERE clause.
The following example demonstrates how you would use a WhereText variable for the $getWhere method. The same code works with the $selectWhere method.
; Find all the invoices on or after the specifed invoice date for the specified vendor.
Calculate VendorName as "O'Brian's Auto Repair"
Calculate InvoiceDate as '05-JUN-2005'
; Use WhereText to get records.
; Replace each quote character with a wildcard underscore character.
Calculate VendorName as replaceall(VendorName,"'","_") ;; Single quotes.
Calculate VendorName as replaceall(VendorName,'"','_') ;; Double quotes.
Calculate SQLText as con("WHERE VendorName = '",VendorName,"' AND InvoiceDate >= CAST('",jst(InvoiceDate,'D:y-M-D'),"' AS DATE)")
; Note: CAST() may not work for all back ends. The date format might not be the same for all back ends.
Do List.$getWhere(SQLText) Returns FlagOK
To accomplish the same thing using a WhereRow variable you would do the following:
; Find all the invoices on or after the specifed invoice date for the specified vendor.
Calculate VendorName as "O'Brian's Auto Repair"
Calculate InvoiceDate as '05-JUN-2005'
; Use WhereRow to get records.
;
; Values in [] square brackets are the column number of the where row that the value will be found.
Calculate SQLText as con("WHERE VendorName = [2] AND InvoiceDate >= [3]")
; Defined and set the values of where row.
Calculate WhereRow as row(SQLText,VendorName,InvoiceDate)
Do List.$getWhere(WhereRow) Returns FlagOK
The WhereRow technique might seem like extra work, but it guarantees that your where clause will work with different back end databases.
OmnisSQL does not support bind variables for the LIKE operators however if you are connected to the Omnis data file the tBase methods in StudioWorks will automatically check for any LIKE operators and move the value from the bind variables row into the SQL text and replacing any single or double quotes in the value with underscore characters. So whether you are using the Omnis data file or another RDBMS you should always use bind variables for your values.
$doworkBatch
The $doworkBatch method is an StudioWorks table class method which does more than the built-in $dowork method provided by Omnis Studio.
Both methods will do the smartlist deletes, updates, and inserts for you.
The $doworkBatch method takes care of setting primary keys, administrative columns (InsBy, InsModDate, ModBy, ModDateTime, EditNum), checking for no null, no zero, no blank values as per the meta-data, and checking for child records before doing restricted or cascading deletes.
The $doworkBatch method has 2 parameters:
- pbSaveListWork - default kTrue. The $doworkBatch method will issue a $savelistwork for you if there are no errors reported. This sets the history list to match the normal list.
If you are doing manual transactions with rollback/commit you will want to set pbSaveListWork to kFalse and handle the $savelistwork yourself. Here is sample code of how you would do this.; Define the list.
Do lsts.$retDefinedList('sSchemaClassName') Returns List
; Set it to be a smartlist.
Do List.$smartlist.$assign(kTrue)
; Merge the import list records. (Status will be kRowInserted)
Do List.$merge(ImportRecordsList,kTrue) ;; (Match column names)
; Store the transaction mode setting before we change it.
Calculate StartTransSetting as List.$sessionobject.$transactionmode
; Set to manual transactions.
Do List.$sessionobject.$transactionmode.$assign(kSessionTranManual)
; Open a working message
Calculate workingmssg as "Inserting imported data..."
Working message /-1072741743,-1072741739;50;0;0 {[workingmssg]}
; Do the inserts.
Do List.$doworkBatch(kFalse,kFalse) Returns FlagOK ;; (Save list work, Check data)
If FlagOK
; All went well, commit the transactions and make the history list match the normal list.
Do List.$commit()
Do List.$savelistwork()
Else
; Error occurred. Rollback the transactions.
Do List.$rollback()
End If
; Set the transaction mode back to what is was when we started.
Do List.$sessionobject().$transactionmode.$assign(StartTransSetting)
; If an error occurred report it to the user. (If this is a visual class method)
If not(FlagOK)
Do errhndlr.$promptonceLastError()
End If
Quit method FlagOK - pbCheckData - default kTrue. The method will check for no null, no zero, no blank values as per the meta-data, and checking for child records before doing restricted or cascading deletes before trying to write the changes to the data base. The assumption is that the database is dumb (e.g. Omnis data file). Having StudioWorks check the data does hurt performance! If you are doing a large batch of database writes (e.g. Importing data) you will want to set pbCheckData to kFalse. There is a huge speed difference. However, be warned, you need to make sure the data is clean before you issue the $doworkBatch.
If you are only doing inserts use the $doinsertsBatch method. If you are only doing updates use the $doupdatesBatch method. $doworkBatch calls $dodeletesBatch, $doupdatesBatch, and $doinsertsBatch, so you save a couple method calls if you just call the $do...Batch method which applies directly to your operation.
If you are going all out after speed use the built-in $dowork method with manual transactions... but be sure to take care of setting the primary key and admin columns before issuing $dowork. The built-in $dowork uses different parameters that $doworkBatch... be sure to use the correct parameters!
For the fastest possible performance use manual transactions, a statement object, $prepare your statement using bind variables, and then use $execute inside a loop, followed by $commit if all went well, or $rollback if there was an error.Set Default Value
You can specify default values for new records in the under the tab of any schema class. If you hover of the field a tooltip will appear providing you with different options available to you for setting the default value for a column. The following examples give you an idea of what you can enter in the meta-data field.
- Number or Character value e.g. 0, 1, Male, Female
- Hash Variable. e.g. [#D], [#T]
- Omnis Function. e.g. [fday(kMonth,#D)], [dpart(kYear,#D)]
- Any Column Value in the same row. e.g. [???.Parent_pkey], [con(???.LastName,', ',???.FirstName]
- Security Object $:User... prefixed method in brackets. e.g. [$:UserKey], [$:UserFormalName]
- Task Variable Property Method in brackets. e.g. [cn.$:MainCompanyFormalName]
You can set the default value to call any task variable method which returns a value.
Table Class Structure
SQL92 is the standard which RDBMSs are supposed to comply with, however not all RDBMSs are fully SQL92 compliant and there are operations like getting the next primary key for a new record which are not part of the SQL92 standard.
The Omnis data file is only partially SQL92 compliant. It doesn't support foreign keys, restricted and cascading deletes, using bind variables with LIKE operators. PostgreSQL uses ILIKE rather than LIKE for case-insensitive selects. The list of SQL variances goes on an on.
In order to deal with SQL variances between different RDBMSs we needed to develop a class structure that is easy to extend and maintain.
Omnis Studio table classes are specially designed to work with databases. Table classes come with a number of built in methods to make life easier for developers. To use a table class you set its $sqlclassname property to a schema or query class and then instantiate and bind it to a list or row variable using the $definefromsqlclass method.
Do List.$definefromsqlclass('SQLClassName')
A base table class can be created and then subclassed for different schema or query classes. Custom methods can be added to the subclasses.
However, we run into problem with this superclass/subclass structure when we attempt to deal with SQL variances for the different RDBMs. A switch/case would have to be added to every method where a SQL variances would affect code execution. Not a good situation.
The solution is to use the bridge design pattern. When the base table class is initiailzed it instantiates an oTableClassMethods_DBMSVENDOR object class for the DBMS vendor of the database that we are connected to. All messages received by the base table class are forwarded to the matching oTableClassMethods_DBMSVENDOR method.
For some of the table class methods we would like to be able to access them outside of the table class instance/structure.
- Primary key related methods are needed by the oDBAdmin classes.
- Check data related methods could be needed by some window classes or object classes.
To make it easy to access and modify those methods we moved them to other object classes where they can be called by either the table class methods object, the DB Admin classes, or some other class.
- Primary key related method are put in oPrimaryKey_DBMSVENDOR object classes.
- Check data related methods are put in oCheckData_Tablename object classes.
The following diagram gives you an overview of the StudioWorks Table Class structure.
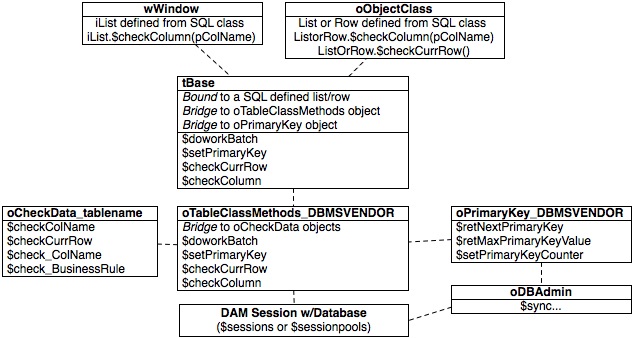
Table Class Methods Objects
In StudioWorks you should always get your SQL defined lists from the $retDefinedList method of oSQLLists.
Do lsts.$retDefinedList('SchemaOrQueryName') Returns List
The $retDefinedList method not only does the $definefromsqlclass method with tBase for you, it also sets the $sessionobject property, and initializes the table class instance sending it a number of parameters that are required for the tBase instance to work properly.
When the SQL defined list receives the $initialize message for $retDefinedList it instantiates the correct oTableClassMethods_DBMSVENDOR object class and sends the object an $initialize message that includes the table class instance.
Do ioMethods.$initialize($cinst,...)
oTableClassMethods sets its irListRow ivar to reference the table class instance.
Set reference irListRow to prTableClassInst.$ref
This is important to know when you are looking at oTableClassMethods methods. irListRow is a reference to the SQL defined list or row variable. The table class is so tightly bound to the list or row variable that the two are one. (Sounds like a marriage ceremony.)
You can override the StudioWorks oTableClassMethods_DBMSVENDOR series objects by creating your own subclasses with the same names in your main library. tBase will first look in the startup task library before using its own objects.
You can also subclass tBase to your own module and rename the subclass to tSchemaOrQueryName and override and set the $sqlclassname property to point to the appropriate schema or query class. The $retDefinedList method will use the subclass tBase2 in the module when requested to define a list for that schema or query class. You can add custom methods to the subclass. You could override the superclass methods... but this breaks the bridge pattern to the oTableClassMethods_DBMSVENDOR object for that method.
The table class structure has been designed to avoid the need to subclass tBase. Look at other options before you subclass tBase.Primary Key Methods Objects
The methods which deal with setting primary keys are in an oPrimaryKey_DBMSVENDOR series of object classes. This makes it easy for the oDBADmin objects and the oTableClassMethods objects to access the same code.
For each of the oPrimaryKey methods the sender must pass in a statement object which the the method can use for executing its SQL.
oPrimaryKey_abstract is subclassed for each DBMS vendor. The uppercase of DBMS vendor's name (not the DAM name) is used as the suffix of the subclass.
For some DBMS vendors (PostgreSQL, FrontBase, SQLServer) the DBMS has primary key counter methods, for other DBMS vendors (Omnis data file, MySQL) the Refs table is used for the primary key counters. What gets used for the primary key counter is decided by the oPrimaryKey_DBMSVENDOR subclass object.
You can override the StudioWorks oPrimaryKey_DBMSVENDOR subclass object by copying or subclassing it to your main library. The subclass in your main library with the same will supercede the one in swBase4.
You can work directly with an oPrimaryKey_DBMSVENDOR object, or you can use the oPrimaryKey bridge object. The oPrimaryKey bridge object has an $initialize method to which you pass the pDBMSVendorName. The oPrimaryKey class then finds and instantiates the correct oPrimaryKey_DBMSVENDOR object class for you, checking your main library, then swBase4. Messages sent to oPrimaryKey are forwarded to the instantiated oPrimaryKey_DBMSVENDOR object class.Check Data Methods Objects
The methods which deal with checking data are in an oCheckData series of object classes. This makes it easy for the window classes, object classes, or oTableClassMethods objects to access the same check data code.
It also makes it easy for schema and query classes using the same base table to access the same check data code.
You can create an oCheckData_Tablename subclass of oCheckData in the module where the schema class for that table class exists.
The subclass must be created in the same library as the base schema class.
The subclass suffix must be the cap(Tablename) of the servertablename. e.g. oCheckData_Contact, not oCheckData_contact
For example you may want to have the a Contact table with an Email column. For uniformity you want all email address to be lowercase characters. You also want to do some basic checking on the email address format to make sure it is valid. To check/fix the Email column you would do the following:
- Create a subclass of oCheckData.
> select the target library > > > Subclasses > select oCheckData
oCheckData_Contact
Click the Button - Add a $check_Email method to the oCheckData_Contact class.
- Add appropriate code to the method. For example:
If len(irListRow.EmailAddr)=0
; Empty email address is not an error for this table.
Calculate FlagOK as kTrue
Else
; Set the email address to lowercase.
Calculate irListRow.EmailAddr as low(irListRow.EmailAddr)
; Check the format of the email address.
If pos('@',irListRow.EmailAddr)=0
Calculate Mssg as "The email address must include an @ character"
Calculate Dtls as ''
Else If pos('@',irListRow.EmailAddr)=1
Calculate Mssg as "The email address can not begin with an @ character"
Calculate Dtls as ''
Else If pos('.',irListRow.EmailAddr)=1
Calculate Mssg as "The email address can not begin with period character"
Calculate Dtls as ''
Else If pos('.',irListRow.EmailAddr)=0
Calculate Mssg as "The email address must include a period character"
Calculate Dtls as ''
Else If pos('.',irListRow.EmailAddr)>len(irListRow.EmailAddr)-3
Calculate Mssg as "The email address must include a domain name at the end"
Calculate Dtls as ''
End If
If len(Mssg)
Do $cinst.$_logError($cmethod,Mssg,Dtls)
Else
Calculate FlagOK as kTrue
End If
End If
Quit method FlagOKFor checking email addresses and phone numbers you will want to create a common object which specializes in checking and formatting email addresses and phone numbers and it then be called by all the applicable oCheckData methods.
- The $check_Email method will automatically be called when oTableClassMethods is sent a $checkCurrRow message and its base table is contact.
If you wanted to do data validation of the Email field in a window class as the user leaves the field you would enter the following code in the $event method of the Email field.
On evAfter
Do iList.$checkColumn('Email') Returns FlagOK
If not(FlagOK)
Do errhndlr.$promptonceLastError()
; If you want to keep the user in this field.
Quit event handler (Discard event)
End If
; Be sure to pass the event to the next handler so that the SW field handler can undecorate the field.
Quit event handler (Pass to next handler)
Manual Transactions
If you are working with an RDBMS that supports COMMIT and ROLLBACK you may want to make use manual transactions when you are saving batches of records, or a sequence of inserts where a parent records is inserted immediately followed by one or more child records.
In these situations if you set the session object $transactionmode to kSessionTranManual at the start of the batch; you can issue a $rollback at the end if an error occurs and the database will undo the database writes, or if all goes well you can issue a $commit and all the database writes are fully saved by the database.
The control point for the decision to $commit or $rollback transactions is outside of the table class. If you are using manual transactions be sure to set the pbIssueSaveListWork parameter of $doworkBatch to kFalse, and then remember to send a $savelistwork message to your smartlist when you commit the transactions.
Always be sure to set the $transactionmode back to kSessionTranAutomatic at the of the method.
The following sample code shows how you might use manual transactions in your code:
; Store the current $transactionmode, set to manual transactions.
Calculate StartMode as db1sess.$transactionmode
Do db1sess.$transactionmode.$assign(kSessionTranManual)
; Insert parent list records.
Do ParentList.$doworkBatch(kFalse) Returns FlagOK ;; (bIssueSaveListWork)
If FlagOK
; Insert child records.
Do ChildList.$doworkBatch(kFalse) Returns FlagOK ;; (bIssueSaveListWork)
End If
If not(FlagOK)
; Something went wrong. Rollback all database changes.
Do db1sess.$rollback()
Else
; All went well, commit the database changes and make the history list the same as the normal list.
Do db1sess.$commit()
Do ParentList.$savelistwork()
Do ChildList.$savelistwork()
End If
; Always set the transaction mode back to its original setting.
Do db1sess.$transactionmode.$assign(StartMode)
Quit method FlagOK
Views
Views can be created with most RDBMSs. The Omnis data file does not support views.
A is created on the database and is much like a query class in Omnis Studio. A view can include a reduced set of columns from one table. A view can be used to join columns from multiple tables. A view can change the names of columns.
A following example creates a simple view on the database:
CREATE VIEW ViewName AS
SELECT ColName1, ColName2, ColName3
FROM TableName
A view which joins two table and changes then names of tow columns is as follows:
CREATE VIEW ViewName AS
SELECT ColName1, ColName2 AS NewColName2, ColName3 AS NewColName3
FROM TableName1, TableName2
WHERE TableName1.ColName_fkey = TableName2.ColName_pkey
You can get as complicated as you like with the SELECT that is used to create the view. It could include max() or min() functions, left joins, sub-selects, additional where text, etc.
For each view you create on the database, you need to create a schema class in Omnis Studio which maps to the view. The schema class columns must match the names of the columns in the view. The columns order doesn't matter.
What makes views extremely handy for Omnis Studio is that you can create a view of what would normally be an extremely complicated SELECT in Omnis Studio. Once the view has been created on the database and a schema class is mapped to it, there is no complicated SELECT code needed on the Omnis Studio side. To Omnis Studio the view just another schema class and you can use a simple WHERE clause without thinking about the complicated SQL that may have been used to create the view.
Views are primarily used to select data.
To work with views in StudioWorks:
- Prefix the schema class name with lower case v rather than lower case s. e.g. vViewname
Doing so lets StudioWorks know that the schema class is mapped to a view rather than an actual basetable. - Enter the CREATE VIEW statement in the meta-data of the schema class.
If the CREATE VIEW statement is entered there the tool is able to create the view for you when you sync your app to the database.
Multiple Joins To One Table
In StudioWorks we use views for making more than one join to a parent table.
Suppose you have a Person table in your database which is a list of people.
Person_pkey
LastName
FirstName
You then create a Rel table which is used to indicated the relationships between different people in the Person table.
Rel_pkey
Person1_fkey
Person2_fkey
RelPerson1to2
RelPerson2to1
Person1_fkey and Person2_fkey are foreign keys which reference Person.Person_pkey
We are unable to create a query class in Omnis Studio to make more than one join to the Person table.
To solve the problem we can create two views as follows:
CREATE VIEW Person1 AS
SELECT Person_pkey, LastName AS Person1LastName, FirstName AS Person1FirstName
FROM Person
CREATE VIEW Person2 AS
SELECT Person_pkey, LastName AS Person2LastName, FirstName AS Person2FirstName
FROM Person
We then create the view schema classes as follows:
vPerson1 with the $servertablename set to Person1 and the columns as follows:
Person_pkey
Person1LastName
Person1FirstName
vPerson2 with the $servertablename set to Person2 and the columns as follows:
Person_pkey
Person2LastName
Person2FirstName
Do not change the primary key column name in the view if you wish to use the view for StudioWorks generated lookups.
We need to create the query class for listing and editing relationship records. The following columns are included in the qRel query class which we can use to list and edit the Rel table records.
sRel - Rel_pky
vPerson1 - Person1LastName
vPerson1 - Person1FirstName
vPerson2 - Person2LastName
vPerson2 - Person2FirstName
sRel - RolePerson1to2
sRel - RolePerson2to1
sRel - Person1_fkey
sRel - Person2_fkey
sRel - EditNum
sRel - ModBy
sRel - ModDateTime
sRel - InsBy
sRel - InsDateTime
The $extraquerytext to join the tables is as follows:
WHERE Person1_fkey = Person1.Person_pkey AND Person2_fkey = Person2.Person_pkey
StudioWorks knows from the meta-data that Person1_fkey references Person.Person_pkey and that Person2_fkey references Person.Person_pkey. But StudioWorks can not quickly determine that vPerson1 and vPerson2 are views of the Person table. We need to specifically enter vPerson1 and vPerson2 respectively as the fields in the meta-data for the vPerson... columns in the qRel query class where we want StudioWorks to do lookup type-ahead for us.
The query column meta-data also has a field. You can enter an SQL where clause which you want StudioWorks to include when selecting the name to display in the lookup droplist. In this situation we don't want a relationship record which has the same person as Person1 and Person2. Adding following lookup where text in the qRel columns meta-data will solve the problem:
In the Person1LastName and Person2FirstName columns lookupwhere meta-data of qRel:
WHERE Person_pkey <> Person2_fkey
In the Person2LastName and Person2FirstName columns lookupwhere meta-data of qRel:
WHERE Person_pkey <> Person1_fkey
With all of the above in place, StudioWorks can autoconfig the PersonList, PersonEdit, RelList, and RelEdit window instances, successfully generate the droplists in the Person1 and Person2 lookup fields of the RelEdit window instance, and correctly set the foreign key values in the Rel table.
The StartNewApp libraries includes a myViewsDemo library which demonstrates all of the above. Before you can use the demo you will need to create a database in FrontBase or MySQL, use the Database Administration tool to create the tables and views and then move the data from the Omnis data file to FB or MySQL. You then need to again changing the session to point to your FB or MySQL database.