Sw4 > Userdocs > User Docs (All Contents)
User Documentation
This section covers documentation for end users of StudioWorks framework based applications.
The end user documentation is meant to be a general guide. Exceptions and variations will exist for different applications that are built on the StudioWorks framework.
The StudioWorks framework software can run on Windows XP, Windows Vista, Mac OS X, and Linux.
In the documentation:
- for Windows/Linux users means; hold down the key and press down the left button on the mouse.
- for Apple/Mac users means; hold down the key and press down on the left front corner of the mouse.
Startup
To startup your application look for a file called open_NameOfApplication (Replace NameOfApplication with the actual name of your application.)

Double-click the file to open the application.
The open_NameOfApplication will in turn open the other files that are needed and connect to the database where your information are stored.
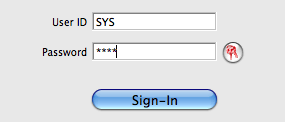
All going well a window will be opened.Sign-In (Logon)
In the window you will need to enter your and .
The default user ID and password during application development and testing is normally:
SYS
pass
After you enter the user name and password click the button.

Main Window
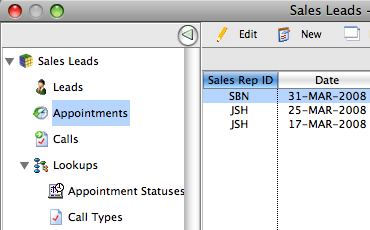
The main window has a navigation treelist on the left side.

As you click on different nodes in the treelist, subwindows will appear in the right side of the main window. The subwindows let you find, view, insert, edit, export, and print your data.
You can open more than one subwindow for a particular node by shift+clicking on a node. A standalone subwindow will be opened. This allows you to look at more than one record at a time. You can resize and reposition the standalone window on your screen.
You can resize the navigation treelist width by dragging the right edge of the treelist to the left or right. The resized treelist width will be saved.
You can hide/show the navigation treelist by clicking the green arrow button at the top of the navigation treelist.

Toolbars
Most windows have a toolbar near the top of the window. The toolbar has various buttons which you can click to initiate different actions.

What buttons you see in the toolbar is dependent on the window, the mode, and your security permissions.
In list mode, the toolbar could have the following buttons:
- - Opens a window where you can make changes to the currently selected record.
- - Opens a window where you can enter a new record.
- - Makes a copy of the currently selected record and opens a window where you can make changes to the copy of the currently selected record. The new record is not created until you save the new copy record.
- - Deletes the currently selected record(s). You will not be allowed to delete a record which has other records connected to it.
- - Opens a Find window which lets you enter multiple criteria to search for records.

You can shift+click on the button to instantly fetch all records.

Only the first 500 records will be fetched. A button will appear in the bottom right corner of the window if more records are availalbe to be fetched. Each time you click the button, 500 more records will be fetched and appended to the list.
- - Prepares a report preview with the listed records.

If one record is selected all the records in the list will be included in the report. If more than one record is selected, only the selected records will be include in the report.

Shift+Click to select multiple lines in the list.
Ctrl/Cmd+Click to select/deselect individual lines in the list. - - Exports the listed records to a tab delimited file.

If one record is selected all the records in the list will be exported. If more than one record is selected, only the selected records will be exported.
In edit or new mode, the toolbar could have the following buttons:
- - Saves the new or changed record to the database and goes back to the list mode subwindow.

Provided you are not in a multi-line entry field, pressing the Enter/Return key located above the Shift button on the right side of the keyboard, will normally do the same thing as clicking the button.
- - Saves the new or changed record to the database without going back to the list mode subwindow.
- - Cancels any changes since the last save and returns to the list mode subwindow.

Pressing the Esc key located near the top left corner of the keyboard normally does the same thing as clicking the button.
- - Undo any changes since the last save without going back to the list mode subwindow.
- - Saves the current record and starts a new record without going back to the list mode subwindow.
Searchbar
Some list mode window may have a searchbar just below the toolbar. The searchbar is a quick way to search for record records based on a single set of criteria.

- The left column is the search field that you want to search on.

You can click the droplist to change the search field, or press the up or down arrow key when focus is on the search field.
- The middle column is the operator you want to use when comparing the search field with the search value.

You can press the tab key to move from the search field to the operator field. You can click the droplist to change the search field, or press the up or down arrow key when focus is on the search field.
- The right column is the search value. Enter whatever value you want to use to search for records.
- The button on the far right is the search button. Click the search button after you have entered all of the search criteria.

If the search value field is an entry field you can press the Return/Enter key on the keyboard after you enter the search value instead of clicking the search button
Entry Fields
When you are in new or edit mode you can move from one entry field to the next entry field a few different ways:
- Move the mouse over the next entry field and click down on the mouse. This is the least efficient way to move from field to field.
- Press the Tab key on the keyboard. To move to the previous field press Shift+Tab.
- Press the Enter key located on the numeric keypad. To move to the previous field press Shift+Enter.

The Enter key on the numeric keypad is different than the Enter/Return key located above the Shift key on the right side of the keyboard.
When the focus is on a field, the field will normally have a colored border. The colored border is used to hints things to you:
- Blue border is a normal entry field.

- Dashed border is an uppercase field. You do not need to press the shift or caps lock field when typing in a dashed border field. The letters are automatically converted to uppercase for you.

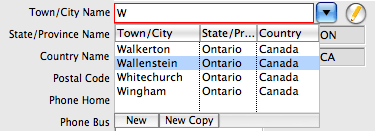
- Red border is a lookup entry field. A lookup field links the current record to a record in a different window. (In the database world we call this a foreign key to a referenced table.) As you type characters in a lookup field, matching records in the referenced table are fetched and listed below the lookup entry field. If you see the record you want to link to you can click on it with the mouse, or press the up or down arrows to move to select it, then press the tab key to go to the next field.

To see all of the available lookup records enter just the ? character in the lookup field. If more than 50 records are found a button will appear in the bottom right corner of the lookup list. Click the button to fetch the next batch of 50 records. Some lookup fields have droplist button to the right of the field. Clicking the droplist button does the same thing as typing a ? character in the field.
If the lookup record you need is not yet created, and you are permited to create new lookup records, you can type the new lookup record value you want and tab out of the field, or click the or button which appears at the bottom of the lookup records list. This opens a new mode subwindow for the lookup record. You can finish entering the lookup data and press . The new lookup record will be created and you will be returned to the previous subwindow where you can continue entering information.
Some lookup field have a yellow pencil icon to the right of the field. Clicking the yellow pencil opens the lookup record in an edit or view mode window if you have permission to edit or view the lookup record. - Beige background is a click edit field. You need use the mouse and click on this field in order to edit it.

- Grey background is a display only field. You can click on the field and then press Ctrl/Cmnd+C to copy the contents to the clipboard. Other keystrokes are ignored.

- Blue background is a notes field. When you click on the field it opens a much bigger size field where you can view or edit the field value. When you leave the expanded field it disappears.

Quit/Exit the Application
To exit or quit the application:
- Windows/Linux user can click either select in the menu or click the application's window close box on the top right corner of the screen.
- Mac users select the from the menu.