Sw4 > Web > Web (All Contents)
Web
This section covers various web/internet topics relating to StudioWorks. The StudioWorks framework is not advertised as being web savvy. However various StudioWorks developers are creating StudioWorks applications which can be accessed using a web browser.
The Web App Server version of Omnis Studio makes it possible for your Omnis Studio application to receive HTTP requests from web browsers and respond to those requests.
There are two options for interacting with the client web browser:
- Install the Omnis Web Client plug-in on the client computer and develop remote forms.
- No plug-in on the client computer and return simple HTML.
Developing web applications using the remote forms has some drawbacks:
- Each client must download and install the Omnis plug-in.
- Constant client connection requires multiple Omnis Web App Server licenses.
Web Apps
It is recommended that you first write your application as a StudioWorks non-web app. StudioWorks app development is easiest to in the normal non-web environment. Once you have the non-web application built and working, you can then write the additional bits to make the application web app capable.
The swWeb4 library contains classes which can be used for generating an StudioWorks web app.
The classes contained in the ServerMonitor folder are for monitoring Omnis web app server activity. If the startupsettings.txt file sets the appmode to web, the mWebMonitor menu is installed and the wWebMonitor window is opened by the oStartupTaskDefaultMethods object.StudioWorks+JavaScript
By combining JavaScript, the Omnis Web App Server, and the StudioWorks framework we are able to create a zero footprint StudioWorks web application. (No Omnis Web Client plugin, no remote forms, no Java applets.)
The project has been dubbed SW+JavaScript.
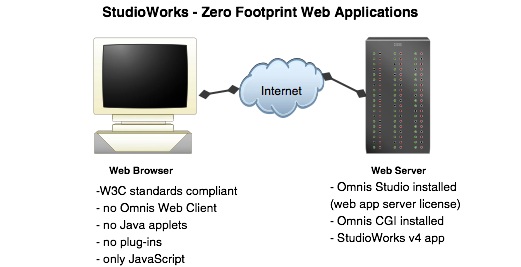
JavaScript is used to do event handling, basic validation, user prompts, and to submit requests to the Omnis Web App server. The Omnis Web App Server receives the request and passes it to the StudioWorks application running on the server. The StudioWorks application processes the request and returns the content for the next page.
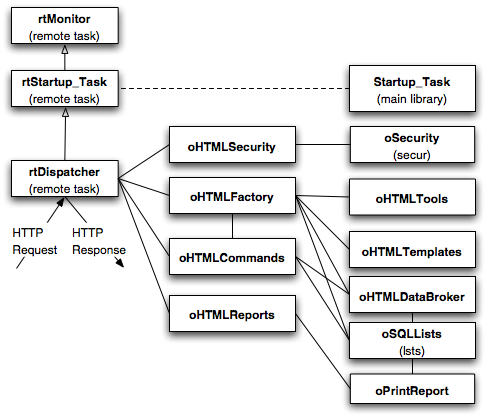
The Omnis Web App Server instantiates the rtDispatcher remote task passing along the HTTP parameters. The remote task binds itself to the main library Startup_Task, giving it access to the StudioWorks application's class instances. The remote task then dispatches the request to the applicable object class which processes the request and returns the HTML for the next page or a URL to point the web browser to a different page.
The web page that is returned to the user is made of 3 components.
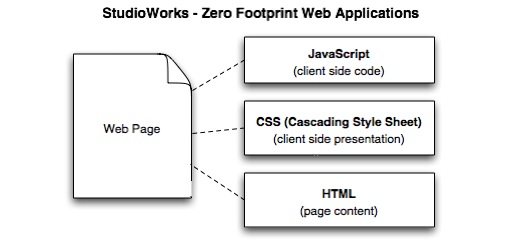
- JavaScript for client side code. The web page links to the actual JavaScript code which is located in separate files.
- CSS (Cascading Style Sheets) for the client side presentation. The web page links to the CSS file.
- HTML for the actual content.
By breaking the web page into these 3 distinct components we simplify and minimize the amount of HTML which our StudioWorks application has to prepare and return to the client. The JavaScript code is generic so that it can be reused over and over. The CSS file contains all of the color and font information that would normally be included in the web page.
The goal for this project is to be able to write a normal StudioWorks application, add the web module with its basic classes, install the app on a web server and be able to sign-in, navigate, search, edit, insert, delete records, and run reports from any web browser.JavaScript Programming
Programming in JavaScript is not for the faint of heart.
You use a text editor (e.g. BBEdit) for writing JavaScript and then test your code with a browser. If your JavaScript code doesn't work you look at the browser's error log to find out why and where the code failed. One incorrect character in your code can stop all of your JavaScript functions. Everything is case sensitive.
At the time of writing this, FireFox is the browser of choice for JavaScript programming. The FireFox error log is the most informative of the ones I've tested. For IE compliance you will have to retest your JavaScript with the IE browser.
For FireFox and Safari, if you make changes to a JavaScript file you need to clear the browser cache before you reload the page to make sure your modified JavaScript file is reloaded by the browser.
There is tons of JavaScript code information and tips on the internet. If you Google a JavaScript question you'll find many pages of answers.
To learn JavaScript I purchased and read two books.
- JavaScript - A Beginners Guide by John Pollock.
This book was a good introduction to learning JavaScript but it doesn't go deep enough for more complex JavaScript. - JavaScript Bible by Dany Goodman
This book is a great JavaScript reference book. For me, writing JavaScript without this book would have been very difficult and taken much longer.
Multiple Languages
The StudioWorks framework is designed to support multiple languages but not within a single instance of the Omnis Studio. You will likley need to run a separate instance of your StudioWorks application for each language you wish to serve over the web. The language must be set by the user which opens the StudioWorks application on the web server. You will need a different WebAppLibName for each language. e.g. LibrarianWeb_it, LibrarianWeb_fr.
As of 2006-03-28 running multiple languages on a web app has not been tested.Lookup Type-Ahead Droplist
As of 2006-03-28 the ability to do a type-ahead or droplist on lookup records has not been implemented. To do so would require the use of the XHMHttpRequest object. If you require this functionality you will need to dig in and write your own code to accomplish this. See the topics and .Fetch Limit and More Button
As of 2006-03-28 limited the number of records returned by a search and adding a More button to the search results web pages has not been implemented. If you require this functionality you will need to dig in and write your own code to accomplish this. I'm not sure how to accomplish this since the statement object used to fetch the first batch of records will be lost when the remote task is closed. Subsequent fetches are only available to the same instance of the statement object which issues the select.

MySQL has a LIMIT option for SELECT which allows you to specify the offset and number or rows, but implementing LIMIT would only work if you use MySQL for the database.
JavaScript AutoSuggest
There is an excellent tutorial written by, Nicholas C. Zakas, available at:
http://www.webreference.com/programming/javascript/ncz/
I printed the 3 tutorials and followed the examples for constructing my own auto suggest lookups. The sample code is well structured and commented. The techniques used are brilliant and elegant.
The 3rd tutorial adds server side logic with an interesting twist by returning the suggestions from the server in JSON syntax (JavaScript Object Notation) rather than HTML or XML. Using JSON is lightweight and simply to code.
To find out more about JSON visit http://www.crockford.com/JSON/js.htmlAJAX - XMLHttpRequest
AJAX is an acronymn for Asynchronis JavaScript And XML
The XMLHttpRequest object lets you send a request from a web page to the Omnis web app server. The response is returned to the object where JavaScript code can take the returned content and use it to dynamically update the existing page. This reduces bandwidth, saves having to refresh the entire page each time you communicate with the web app server, and lets you give the user a richer user interface.
Creating dynamic auto suggest type-ahead fields with dropdown lists is one many things you can implement with JavaScript and the XMLHttpRequest object.
There is a helpful tutorial written by Cameron Adams at:
http://www.sitepoint.com/article/remote-scripting-ajaxSW Web App Instructions
Adding web app functionality to your exsiting StudioWorks application is quite easy.
Developing an StudioWorks web app requires the following:
- A Web developer version of Omnis Studio. The Standard or Enterprise developer versions of Omnis Studio can not be used for developing web applications.
- A computer which can run a web service. (Mac OS X or WinXP Professional)
- The swWeb4 core module in the studioworks folder.
The swWeb4.lbs core library can be found in the studioworks/webapp/ folder. You will need to move the file from the subfolder to the studioworks main folder. - The html folder in the studioworks folder.
The html folder can be found in the studioworks/webapp/ folder. You will need to move the html folder from the webapp subfolder to the studioworks main folder.
Web Server Setup
The following instructions apply to setting up the web server on a Mac OS X computer. In these instruction replace HardDrive with name or your computer's hard drive.
- Copy the nph-omniscgi file from OMNIS/clientserver/server/ folder to HardDrive/Library/Webserver/CGI-Executables/ folder.
- Create a temp folder in the HardDrive/Library/Webserver/Documents/ folder.
- Create a css folder in the HardDrive/Library/Webserver/Documents/ folder.
- Create a js folder in the HardDrive/Library/Webserver/Documents/ folder.
- Copy the contents of the studioworks/webapp/html_copy_to_css/sw folder to the HardDrive/Library/Webserver/Documents/css folder.
- Copy the contents of the studioworks/webapp/html_copy_to_js/sw folder to the HardDrive/Library/Webserver/Documents/js folder.
- Under Mac OS X > > select and make sure it is turned on.
Startup Settings
Modify your startupsettings.txt file to include the following properties:
paths {
htmltemp = PathToLocalHostTempFolder ;
urlhtmltemp = http://localhost/temp ;
}
constants {
autosignin = TRUE ;
appmode = web;
WebAppLibName = WebModuleName ;
WebAppServerURL = http://localhost ;
}
Replace WebModuleName with the name of your web module.
For Mac OS X the PathToLocalHostTempFolder would be HardDrive/Library/Webserver/Documents/temp where HardDrive is replaced with the name of your computer's hard drive.
For Windows the PathToLocalHostTempFolder would be ...

Before setting autosignin=TRUE you must first setup the auto sign-in file. See the documentation under
Create Web App Module
- Make sure the $serverport property in your Omnis Studio preferences has been set to 5913 or another port that you wish to use. This is the port the listens on for requests. My preference is to use 5913 for development and 5912 for runtime.
- and then reopen your StudioWorks app so that the $serverport is set and the startup settings are loaded.
- menu >
- Enter the web module name. My preference is to use the application's main library name replacing Main with Web in the library name.
- Depending on your preference either check or uncheck . I recommend you check stand-alone so that your web app will not be affected by future releases of StudioWorks.
- Click the button.
StudioWorks will create a new library in your APP/libraries/modules folder adding the required classes for the new module.
Create Search Page
You can create static search pages which allows a web browser to search a specific SQL class.
- menu >
- Enter the name of a SQL class which you want to permit the public to access for searching records in your database.
StudioWorks will create a static search web page in your APP folder. You can rename the HTML file to any name you like. - Open the search web page with the internet browser of your choice.
- Select a search column, search criteria, and enter a search value.
- Click the button.

All going well the $construct method of the rtPublicSearch remote class in your web module will receive a request via the Omnis Web App Server. The $construct method will return an HTML web page listing the records.
Create Sign-In Page
You can create a sign-in web page which is the entry point to you StudioWorks web app.
- menu >
StudioWorks will create a generic Sign-In web page, signin.html in your APP folder. - Open the APP/signin.html page with the internet browser of your choice.
- Enter a valid user name and password which you already have in your StudioWorks application.
All going well the $construct method of the rtDispatcher remote class in your web module will receive a request via the Omnis Web App Server. The $construct method will send a $signIn message to oHTMLSecurity. If the security check is passed, rtDispatcher will forward the call to the oMainWindow object which will return the HTML for the main window page. The main window page has 2 frames. The left frame is the navigation list. The right list is the WinInstID subwindow. - Select a menu line in the navigation list.
The $construct method of rtDispatcher will receive a request via the Omnis Web App Server. The $construct method will send a $signIn message to oHTMLSecurity. If the security check is passed, rtDispatcher will forward a $doCmnd message to the applicable object which returns the HTML for the specified WinInstID. The returned HMTL fills the right frame in the main window page.
Customizing Web Pages
You can customize any of the StudioWorks web app pages by adding a window object class that matches the WinInstiD of the particular web page that you wish to customize. The window object class name must be the WinInstID name prefixed with the letter o. e.g. oBookList, oBookEdit.
The rtDispatcher remote task checks for the presence of applicable window object and if found directs all incoming message to the $doCmnd method of the custom window object.
It is recommended that you subclass the window object class from oList_autoconfig or oEdit_autoconfig and then copy and override the superclass method which you want to modify.
Detailed documentation is not available for customizing oWinInstID window objects. You will need to study the existing methods and step through the code to see how the web pages are generated.Printing Reports
Omnis Studio allows you to print reports to PDF on the Mac OS X platform. If you are running your StudioWorks web app on a Mac OS X server any of the reports you have written for your non-web StudioWorks app can be printed from the web browser.
I purchased a to run my Omnis web apps because of the Omnis Studio print reports to PDF feature on the Mac OS X platform. It was a small cost for the benefit gained.
The applicable reports menu is added to the web page toolbar. If the user selects to print a report, rtDispatcher receives the request and forwards it to the $doCmnd method of the oReportsMenuObserver object of the web module. The behavior at this point is much like the oReportsMenuObserver objects in the non-web modules.
The report is printed to a uniquely name PDF file in the html temp folder on the server. The URL is passed back to the web browser. The web browser either opens the PDF inside the browser, or downloads the file to the client and then opens it with the client's default PDF viewer.
If you add a $ReportInstID method to oReportsMenuObserver, $doCmnd will pass the call to your custom report method giving you complete control over the execution of this method.
Detailed documentation is not available for custom report instance methods. You will need to study the existing methods and step through the code and then copy and modify as appropriate.Uploading to Web Server
After you have developed and tested your web app on your localhost you can upload it to a live web server.
I run my Omnis Web Apps on a stand-alone server totally separate from the server where the public websites are located. All that is need on the customer's website server are the static search pages and sign-in page.
To upload your localhost development web app to a live Omnis web app server:
- Copy the css folder and contents from your localhost to the Omnis web app server's public html root directory.
- Copy the js folder and contents from your localhost to the Omnis web app server's public html root directory.
- Create a temp directory in the Omnis web app server's public html root directory.
- Copy the APP folder and contents to the appropriate location on the Omnis web app server. e.g. Applications, Program Files, usr/local/rainingdata (Do not copy it to a folder in the public html directory.)
- Copy the studioworks folder and contents to the appropriate location on the web server. e.g. Applications, Program Files, usr/local/rainingdata (Do not copy it to a folder in the public html directory.)
- Modify the startupsettings.txt file replacing localhost with the URL or IP address of the Omnis web app server.
- Modify the startupsettings.txt file setting the correct path to the HTML temp folder on the Omnis web app server.
- Install a developer version of Omnis Studio on the web server for testing and debugging. Set the $serverport to 5913.
- Install a web runtime version of Omnis Studio on the web server for live running of your web app. Set the $severport o to 5912.
- Move a copy of your database to the web app server if necessary.
- Open the StudioWorks app on the server with the developer version of Omnis Studio and test the thick client sign-in, finds, edits, etc.
- Create the static sign-in page and search pages for the Omnis web app server and test them.
- When you are ready go live, create the static sign-in page and search pages for port 5912.
- Close the developer version on the Omnis web app server.
- Open the StudioWorks app on the Omnis web app server with the web runtime version of Omnis Studio.
- Test the web runtime version using the port 5912 static pages.
- You can now copy the static search pages and the static sign-in page to the applicable directories on your customer's public website. The static web page names can be changed. You may want to locate the sign-in page in a directory that has .htaccess password protection.
SW Web App Monitoring
The web monitor created by the Omnis Studio is a visual web monitor. The problem with the visual web monitor is that you must be at the web server to watch it and if you close the web monitor window you will lose all of the history.
A non-visual web monitor is available in StudioWorks. The non-visual web monitor object, oWebMonitor, inserts a record for each web app request into a Webappstat table in the database. Summary reports can be generated and emails with the summary web app stats can be sent using a timer object.
This section explains how to set up the oWebMonitor object class for your StudioWorks web app.Startup Task
We instantiate the oWebMonitor object class with a task variable of the main library Startup_Task.
- Add the task var, webmon, type, to the main library Startup_Task
- Point webmon to the oWebMonitor in the swWeb4 library.
- Add a private method, initializeWebMonitor, to the Startup_Task methods.
- Add the following code to the method:
; Get the email address of the person to receive web app stats emails.
Calculate EmailAddr as cn.$:WebAppStatsEmailAddr
; Get the interval the web stats are to be sent. (kDay, kWeek, kMonth, kYear)
Calculate kInterval as cn.$:WebAppStatsInterval
; Initialize the oWebMonitor object.
Do webmon.$initialize(EmailAddr,kInterval) Returns FlagOK
Quit method FlagOK - Add the following code near the end of the $signinOKContinue method.
If FlagOK
Do method initializeWebAppMonitor Returns FlagOK
End If
If not(FlagOK)
Do errhndlr.$promptonceLastError()
End If
Quit method FlagOK
Startup Settings File
If you want web stats to be emailed to yourself or someone else will need to add constants values to the startupsettings.txt file.
- Open the startupsettings.txt file located inside the startupitems folder of your StudioWorks app.
- Add a constants properties section if one doesn't already exist and add the following constants values to be set during startup.
constants {
webappstatsemailaddr = youremail@yourdomain ;
webappstatsinterval = kDay ;
}
You can set the webappstatsinterval to kDay, kWeek, kMonth, or kYear.
How SW Web Monitoring Works
When an HTTP request is received by the Omnis Web App Server the specified remote task is instantiated. After the request is completed the following sequence occurs:
- A $destruct message is sent to the remote task by Omnis Studio
- The $destruct method sends a $destructMethod message to oRemoteTaskMethods
- oRemoteTaskMethods sends an $addConnection($ctask,pEventCode) message to oWebMonitor.
- oWebMonitor inserts a record into the Webappstat table in the database. The record includes: the date/time the connection was opened, the IP address of the client making the request, the number of seconds to complete the request, the remote task which was instantiated.
A similar thing happens with the $event method of the remote task which sends a $eventMethod message to oRemoteTask methods. If the event code is evBusy or evRejected an $addConnection($ctask,pEventCode) message is sent to oWebMonitor. The event code is included in the Webappstat record that is inserted into the database.
Reports can then be generated from records in the Webappstat table.
If you provided a webappstatsemailaddr in the startupsettings.txt file, then the oWebStatsEmailTimer object will automatically send an email with the web stats shortly after the last day of the specified webappstatsinterval. The web stats report is generated by sending a $retWebStatsList message to oWebMonitor and then a $convertWebStatsListToText message. The text is then put into the body of an email and sent to the the specified webappstatsemailaddr.
You can generate web stats reports from your code as follows:
Do webmon.$retWebStatsList() Returns List
If List.$linecount
Do webmon.$convertWebStatsListToText(List) Returns Text
End If
Internet Explorer JavaScript Gotchas
MicroSoft in their infinite wisdom decided to create their own version of JavaScript called, JScript. Internet Explorer (IE) is therefore not a fully W3C compliant browser.
This makes the programmer's job harder, having to create JavaScript workarounds for IE. This section covers any IE JavaScript gotchas which I have run into.
To detect IE in an if statement:
if (document.all)
{
alert("IE Browser");
}
else
{
alert("non-IE Browser");
}
availHeight/Width
The availHeight/Width attributes are not available with IE.
Depending on the version of IE there are different techniques you must use to find the available height and width.
Here's the IE workaround which I eventually found.
var Height
if (window.innerHeight)
{
Height = window.innerHeight;
}
else if (document.documentElement && document.documentElement.clientHeight)
{
Height = document.documentElement.clientHeight;
}
else if (document.body)
{
Height = document.body.clientHeight;
}
return Height;
}
createElement - input
Creating an input element (button, checkbox, ...) is easy in W3C compliant browsers. You create the element, set the type, and add the element. Not so easy with IE. IE won't let you set the type attribute after you create it.
I lost an entire morning trying to find a cross-browser solution to this gotcha. It appears the only way is to create the input element using HTML text which you add to the right location in your page. I ran out of time and never did get it solved.onload
If you create a JavaScript function called onload it will automatically be called when the page has finished loading, except IE.
The IE workaround is add onload to the html body tag and have it call the onload function.
<body onload="onload();" >
The downside to this workaround is that your page must always have an onload() function or a JavaScript error will be generated each time the page is loaded.
Think of onload as the $construct method in Omnis Studio.
If you have an onload() function in your HTML page and an onload() function in a referenced JavaScript file, only one of the onload() functions will be called. If your HTML page references several JavaScript files you have to be careful that each function name is unique.
One strategy is to have an init...() function in each JavaScript file which needs to be run when the page is loaded. (e.g. initSearchBar, initNavList, ...) The onload() function in your HTML page would then call each of the JavaScript file init...() functions as required for that page.
type
W3C compliant browsers let you change the type attribute of an input element.
ElemRef.type = "checkbox"
Not so easy with IE. IE gives you an error if you try to set the type property.
I lost an entire morning trying to find a cross-browser solution to this gotcha. The only way I could find was to replace the input element with a new input element. Adding a new input element is a headache in IE. See createElement - input for more info.window.open
The second parameter, WindowName, can not include any spaces or you will generate an error.
WinRef = window.open('URL_opt','WindowName','AttributesCSV');