Sw4 > Web > SW Web App Instructions
SW Web App Instructions
Adding web app functionality to your exsiting StudioWorks application is quite easy.
Developing an StudioWorks web app requires the following:
- A Web developer version of Omnis Studio. The Standard or Enterprise developer versions of Omnis Studio can not be used for developing web applications.
- A computer which can run a web service. (Mac OS X or WinXP Professional)
- The swWeb4 core module in the studioworks folder.
The swWeb4.lbs core library can be found in the studioworks/webapp/ folder. You will need to move the file from the subfolder to the studioworks main folder. - The html folder in the studioworks folder.
The html folder can be found in the studioworks/webapp/ folder. You will need to move the html folder from the webapp subfolder to the studioworks main folder.
Web Server Setup
The following instructions apply to setting up the web server on a Mac OS X computer. In these instruction replace HardDrive with name or your computer's hard drive.
- Copy the nph-omniscgi file from OMNIS/clientserver/server/ folder to HardDrive/Library/Webserver/CGI-Executables/ folder.
- Create a temp folder in the HardDrive/Library/Webserver/Documents/ folder.
- Create a css folder in the HardDrive/Library/Webserver/Documents/ folder.
- Create a js folder in the HardDrive/Library/Webserver/Documents/ folder.
- Copy the contents of the studioworks/webapp/html_copy_to_css/sw folder to the HardDrive/Library/Webserver/Documents/css folder.
- Copy the contents of the studioworks/webapp/html_copy_to_js/sw folder to the HardDrive/Library/Webserver/Documents/js folder.
- Under Mac OS X > > select and make sure it is turned on.
Startup Settings
Modify your startupsettings.txt file to include the following properties:
paths {
htmltemp = PathToLocalHostTempFolder ;
urlhtmltemp = http://localhost/temp ;
}
constants {
autosignin = TRUE ;
appmode = web;
WebAppLibName = WebModuleName ;
WebAppServerURL = http://localhost ;
}
Replace WebModuleName with the name of your web module.
For Mac OS X the PathToLocalHostTempFolder would be HardDrive/Library/Webserver/Documents/temp where HardDrive is replaced with the name of your computer's hard drive.
For Windows the PathToLocalHostTempFolder would be ...

Before setting autosignin=TRUE you must first setup the auto sign-in file. See the documentation under
Create Web App Module
- Make sure the $serverport property in your Omnis Studio preferences has been set to 5913 or another port that you wish to use. This is the port the listens on for requests. My preference is to use 5913 for development and 5912 for runtime.
- and then reopen your StudioWorks app so that the $serverport is set and the startup settings are loaded.
- menu >
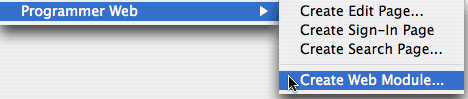
- Enter the web module name. My preference is to use the application's main library name replacing Main with Web in the library name.
- Depending on your preference either check or uncheck . I recommend you check stand-alone so that your web app will not be affected by future releases of StudioWorks.
- Click the button.
StudioWorks will create a new library in your APP/libraries/modules folder adding the required classes for the new module.
Create Search Page
You can create static search pages which allows a web browser to search a specific SQL class.
- menu >
- Enter the name of a SQL class which you want to permit the public to access for searching records in your database.
StudioWorks will create a static search web page in your APP folder. You can rename the HTML file to any name you like. - Open the search web page with the internet browser of your choice.
- Select a search column, search criteria, and enter a search value.
- Click the button.

All going well the $construct method of the rtPublicSearch remote class in your web module will receive a request via the Omnis Web App Server. The $construct method will return an HTML web page listing the records.
Create Sign-In Page
You can create a sign-in web page which is the entry point to you StudioWorks web app.
- menu >
StudioWorks will create a generic Sign-In web page, signin.html in your APP folder. - Open the APP/signin.html page with the internet browser of your choice.
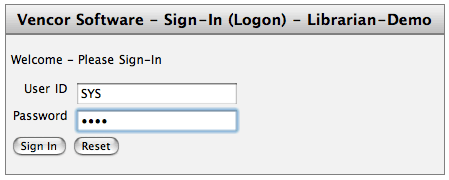
- Enter a valid user name and password which you already have in your StudioWorks application.
All going well the $construct method of the rtDispatcher remote class in your web module will receive a request via the Omnis Web App Server. The $construct method will send a $signIn message to oHTMLSecurity. If the security check is passed, rtDispatcher will forward the call to the oMainWindow object which will return the HTML for the main window page. The main window page has 2 frames. The left frame is the navigation list. The right list is the WinInstID subwindow. - Select a menu line in the navigation list.
The $construct method of rtDispatcher will receive a request via the Omnis Web App Server. The $construct method will send a $signIn message to oHTMLSecurity. If the security check is passed, rtDispatcher will forward a $doCmnd message to the applicable object which returns the HTML for the specified WinInstID. The returned HMTL fills the right frame in the main window page.
Customizing Web Pages
You can customize any of the StudioWorks web app pages by adding a window object class that matches the WinInstiD of the particular web page that you wish to customize. The window object class name must be the WinInstID name prefixed with the letter o. e.g. oBookList, oBookEdit.
The rtDispatcher remote task checks for the presence of applicable window object and if found directs all incoming message to the $doCmnd method of the custom window object.
It is recommended that you subclass the window object class from oList_autoconfig or oEdit_autoconfig and then copy and override the superclass method which you want to modify.
Detailed documentation is not available for customizing oWinInstID window objects. You will need to study the existing methods and step through the code to see how the web pages are generated.Printing Reports
Omnis Studio allows you to print reports to PDF on the Mac OS X platform. If you are running your StudioWorks web app on a Mac OS X server any of the reports you have written for your non-web StudioWorks app can be printed from the web browser.
I purchased a to run my Omnis web apps because of the Omnis Studio print reports to PDF feature on the Mac OS X platform. It was a small cost for the benefit gained.
The applicable reports menu is added to the web page toolbar. If the user selects to print a report, rtDispatcher receives the request and forwards it to the $doCmnd method of the oReportsMenuObserver object of the web module. The behavior at this point is much like the oReportsMenuObserver objects in the non-web modules.
The report is printed to a uniquely name PDF file in the html temp folder on the server. The URL is passed back to the web browser. The web browser either opens the PDF inside the browser, or downloads the file to the client and then opens it with the client's default PDF viewer.
If you add a $ReportInstID method to oReportsMenuObserver, $doCmnd will pass the call to your custom report method giving you complete control over the execution of this method.
Detailed documentation is not available for custom report instance methods. You will need to study the existing methods and step through the code and then copy and modify as appropriate.Uploading to Web Server
After you have developed and tested your web app on your localhost you can upload it to a live web server.
I run my Omnis Web Apps on a stand-alone server totally separate from the server where the public websites are located. All that is need on the customer's website server are the static search pages and sign-in page.
To upload your localhost development web app to a live Omnis web app server:
- Copy the css folder and contents from your localhost to the Omnis web app server's public html root directory.
- Copy the js folder and contents from your localhost to the Omnis web app server's public html root directory.
- Create a temp directory in the Omnis web app server's public html root directory.
- Copy the APP folder and contents to the appropriate location on the Omnis web app server. e.g. Applications, Program Files, usr/local/rainingdata (Do not copy it to a folder in the public html directory.)
- Copy the studioworks folder and contents to the appropriate location on the web server. e.g. Applications, Program Files, usr/local/rainingdata (Do not copy it to a folder in the public html directory.)
- Modify the startupsettings.txt file replacing localhost with the URL or IP address of the Omnis web app server.
- Modify the startupsettings.txt file setting the correct path to the HTML temp folder on the Omnis web app server.
- Install a developer version of Omnis Studio on the web server for testing and debugging. Set the $serverport to 5913.
- Install a web runtime version of Omnis Studio on the web server for live running of your web app. Set the $severport o to 5912.
- Move a copy of your database to the web app server if necessary.
- Open the StudioWorks app on the server with the developer version of Omnis Studio and test the thick client sign-in, finds, edits, etc.
- Create the static sign-in page and search pages for the Omnis web app server and test them.
- When you are ready go live, create the static sign-in page and search pages for port 5912.
- Close the developer version on the Omnis web app server.
- Open the StudioWorks app on the Omnis web app server with the web runtime version of Omnis Studio.
- Test the web runtime version using the port 5912 static pages.
- You can now copy the static search pages and the static sign-in page to the applicable directories on your customer's public website. The static web page names can be changed. You may want to locate the sign-in page in a directory that has .htaccess password protection.